Fluent Meshing|03 抽取几何特征
本案例演示利用FTM流程处理几何模型并恢复几何特征的基本过程。
![](https://public.fangzhenxiu.com/fixComment/commentContent/imgs/1595214343957_tib2md.jpg?imageView2/0)
1 读取几何模型
- 选择使用Fault-tolerant Meshing工作流程,如下图所示顺序设置参数并导入几何模型
![](https://public.fangzhenxiu.com/fixComment/commentContent/imgs/1595214344363_h2x1za.jpg?imageView2/0)
- 导入的几何模型如图所示。模型中存在几何相交以及尖角,在后面网格生成过程中要单独处理。
![](https://public.fangzhenxiu.com/fixComment/commentContent/imgs/1595214343828_3381y8.jpg?imageView2/0)
2 描述几何
如下图所示顺序执行操作。
- 选中模型树节点Describe Geometry And Flow
- 选择选项Internal flow through the object
- 几何中并不存在孔洞,因此无需创建cap,其他参数保持默认设置,点击按钮Describe Geometry And Flow描述几何模型
![](https://public.fangzhenxiu.com/fixComment/commentContent/imgs/1595214343896_g3rfhe.jpg?imageView2/0)
3 识别区域
- 如下图所示操作标识流体区域,注意选择Objects列表项sharpedge
![](https://public.fangzhenxiu.com/fixComment/commentContent/imgs/1595214344024_faychw.jpg?imageView2/0)
- 点击按钮Identify Regions标识流体区域
4 定义leakage
- 选择模型树节点Define Leakage Threshold,采用默认设置,点击按钮Update
![](https://public.fangzhenxiu.com/fixComment/commentContent/imgs/1595214344325_y23kas.jpg?imageView2/0)
5 更新区域
- 选择模型树节点Update Region,确认下方fluid-region-1的Extraction Method为wrap,如下图所示,点击按钮Updata Region Settings更新区域设置
![](https://public.fangzhenxiu.com/fixComment/commentContent/imgs/1595214343787_6bmcs5.jpg?imageView2/0)
6 尺寸控制
- 选择模型树节点Choose Mesh Control Options,下方面板如下图所示设置
![](https://public.fangzhenxiu.com/fixComment/commentContent/imgs/1595214344454_js67ld.jpg?imageView2/0)
- 点击模型树节点Setup Size Controls,设置Minimum Size为0.0001,选择Objects列表框中的所有列表项,如下图所示,点击按钮Setup Size Controls设置尺寸
![](https://public.fangzhenxiu.com/fixComment/commentContent/imgs/1595214344076_zz3btt.jpg?imageView2/0)
7 生成面网格
- 点击模型树节点Generate the Surface Mesh采用默认设置,点击按钮Generate the Surface Mesh生成面网格
![](https://public.fangzhenxiu.com/fixComment/commentContent/imgs/1595214344232_ca3xdp.jpg?imageView2/0)
面网格如图所示。
![](https://public.fangzhenxiu.com/fixComment/commentContent/imgs/1595214344525_d92hty.jpg?imageView2/0)
可以看到有些位置几何特征捕捉不好,需要改进。之所以网格生成不好,原因在于没有将几何特征线释放出来。
8 释放特征
- 右键选择模型树节点Describe Geometry And Flow,选择弹出菜单项Revert and Edit
![](https://public.fangzhenxiu.com/fixComment/commentContent/imgs/1595214343628_tbhi1v.jpg?imageView2/0)
- 如下图所示,选中模型树节点Describe Geometry And Flow,激活选项Advanced Options,如下图所示选择进行特征释放
![](https://public.fangzhenxiu.com/fixComment/commentContent/imgs/1595214344416_znwn3a.jpg?imageView2/0)
- 选择Extraction Method Using为Sharp Angle,指定Objects为sharpedge,点击按钮Extract Edge Features释放几何特征
![](https://public.fangzhenxiu.com/fixComment/commentContent/imgs/1595214344109_c1fqt1.jpg?imageView2/0)
- 设置选择Extraction Method Using为Intersection Loops,并选择Objects为sharpedge与tube,点击按钮Extract Edge Features得到这两个几何体的交线
![](https://public.fangzhenxiu.com/fixComment/commentContent/imgs/1595214343864_xkkutu.jpg?imageView2/0)
- 右键选择模型树节点Generate the Surface Mesh,点击弹出菜单项Update重新生成面网格
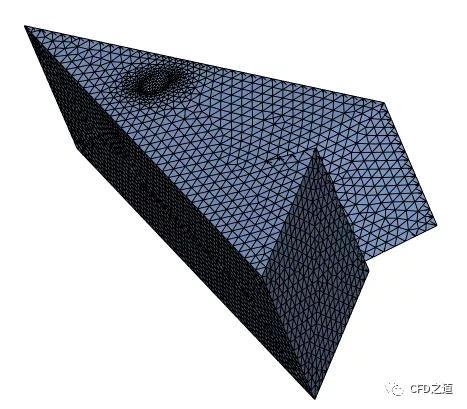
![](https://public.fangzhenxiu.com/fixComment/commentContent/imgs/1595214344491_kcuu5b.jpg?imageView2/0)
此时生成的面网格如图所示。
![](https://public.fangzhenxiu.com/fixComment/commentContent/imgs/1595214343705_rnzscl.jpg?imageView2/0)
锐边和圆孔位置均有较大改善,主要原因是通过特征释放保留了几何边线。
9 边界层设置
- 点击模型树节点Add Boundary Layers,选择no不进行边界层划分,点击按钮Update进入下一步
![](https://public.fangzhenxiu.com/fixComment/commentContent/imgs/1595214343753_0frdsj.jpg?imageView2/0)
9 生成体网格
- 选择模型树节点Gnerate the Volume Mesh,设置Volume Mesh Target Skewness为0.9,点击按钮生成体网格
![](https://public.fangzhenxiu.com/fixComment/commentContent/imgs/1595214344303_jfy07d.jpg?imageView2/0)
- 得到的体网格如图所示。由于前面选择了网格类型为hexcore,因此生成得到的是六面体占优计算网格。
![](https://public.fangzhenxiu.com/fixComment/commentContent/imgs/1595214344167_x6wju5.jpg?imageView2/0)
![CFD之道](https://public.fangzhenxiu.com/user/2023-2/1677045685104微信图片20230222134915.png?imageView2/0/w/90/h/90)
博士
|
教师
探讨CFD职场生活,闲谈CFD里外
获赞 2485粉丝 10651文章 683课程 27