STAR CCM 案例|电池包散热

本文摘要(由AI生成):
本文介绍了使用STAR-CCM进行电动车辆电池组冷却分析的工作流程。首先,电池组由位于液体冷却板上的两个模块组成,每个模块包含有串联成两个并行串的四个电池。然后,使用STAR-CCM中的等效电路模型来执行电热分析,该模型采用电阻电容电阻(RCR)模型,并使用混合脉冲功率特征(HPPC)测试数据来表征电池单元的内部行为。最后,通过阵列操作得到完整的几何模型,并设置流体区物理模型和电池区域。
本教程演示了利用STAR-CCM 进行电动车辆电池组冷却分析的工作流程。
1 问题描述
为了确保电池包在安全温度范围内工作,电池包热管理的设计至关重要,其目的是防止组件的任何部分过热或保证电池在过低温度条件下能够正常工作。如果电池包的尺寸不合适,温度会加速电池的老化,造成电池和电池包的不平衡,或者导致危险的情况。
案例使用最新的STAR-CCM 电池工作流,该工作流程不需要Simcenter BDS的任何输入文件。工作流允许用户在电池的电气行为与其热响应之间紧耦合的情况下执行电热模拟。STAR-CCM 为用户提供了一种用于研究冷却策略或冷却系统设计的性能的工具,以管理各种条件下的快速充电或驱动循环等情况。
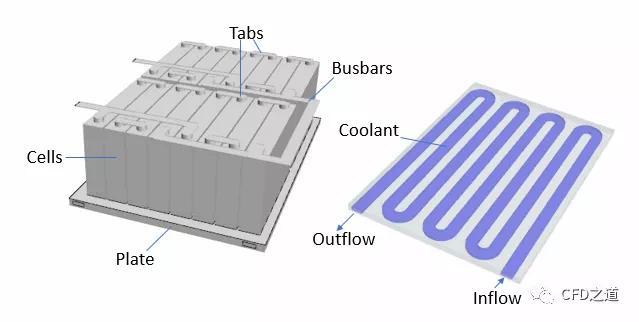
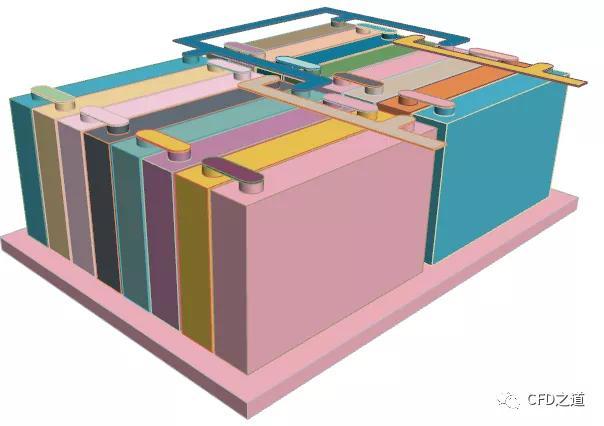
本教程将模拟一个小型电池组,该电池组由位于液体冷却板上的两个模块组成。每个模块中包含有串联成两个并行串的四个电池,其几何模型如下图所示。
您可以使用STAR-CCM中的等效电路模型来执行电热分析。该模型采用电阻电容电阻(RCR)模型,并使用混合脉冲功率特征(HPPC)测试数据来表征电池单元的内部行为。为了捕捉扩散效应,该模型使用了两个RC单元。为了准确地模拟温度依赖关系,该模型有四个温度等级,从10°C到50°C。
电池组特性如下表所示:
| 参数 | 参数值 |
|---|---|
| Pack | 2个模组,每个模组8个电芯 |
| Nominal cell voltage | 3.5 V/电芯 |
| Nominal pack voltage | 28 V = 3.5 V/cell x 4 cells in series x 2 modules in series |
| Capacity per cell | 50 Ah/cell |
| Module capacity | 100 Ah = 50 Ah x 2 strings in parallel |
| Pack energy | 2.8 kWh = 100 Ah x 28 V |
2 STAR CCM 设置
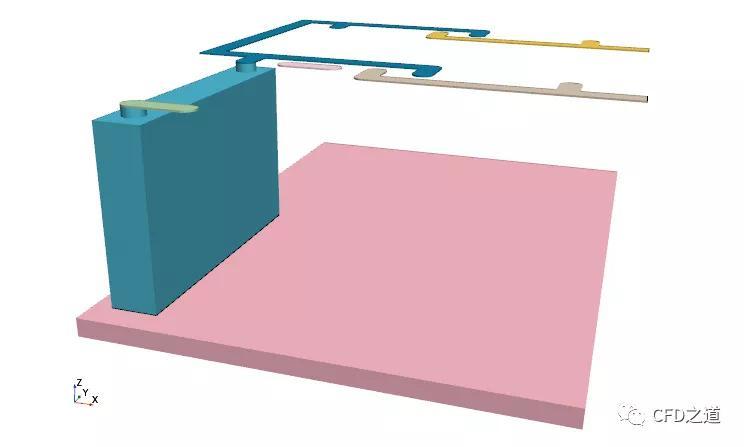
系统将为您提供一个初始仿真文件,其中包含电池几何图形(内部装有冷却液的极板)、一个初始电池单元、一组初始极耳及母排,以及预定义的网格操作。
2.1 导入文件
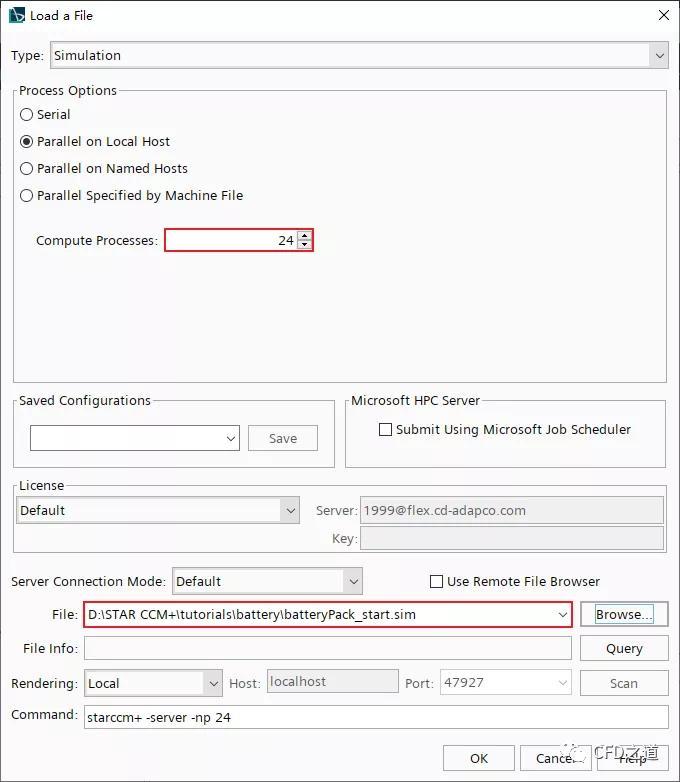
启动STAR CCM 利用菜单File > Load导入初始仿真文件batteryPack_start.sim
查看几何模型,如下图所示。
后面采用阵列操作得到完整的几何。
2.2 常见固体区物理模型
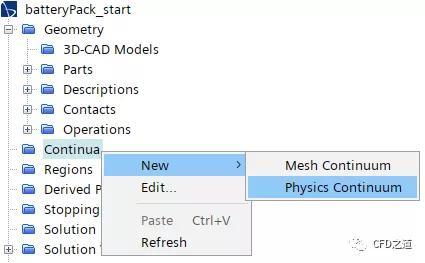
右键选择模型树节点Continua > Physics 1,点击弹出菜单项New → Physics Continuum,创建新的物理节点Battery
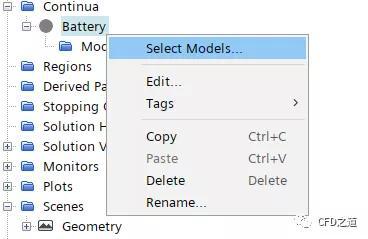
右键选择模型树节点Battery,点击弹出菜单项Select Models… 打开模型选择对话框
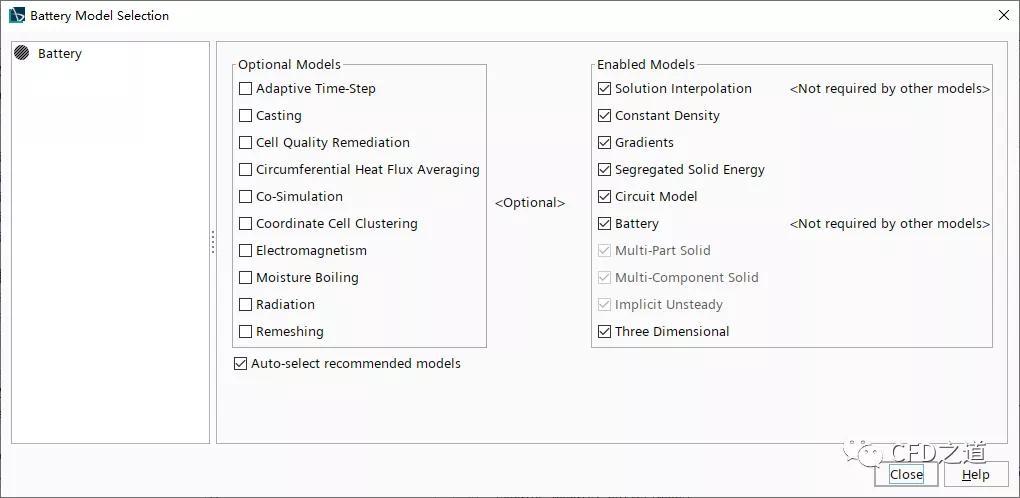
选择以下物理模型 Three Dimensional Implicit Unsteady Multi-Component Solid Multi-Part Solid Battery Segregated Solid Energy Constant Density Solution Interpolation
设置完毕后的模型如下图所示。
右键选择模型树节点Continua > Battery > Models > Multi-Part Solid,点击弹出菜单项Select Mixture Components… 打开材料选择对话框
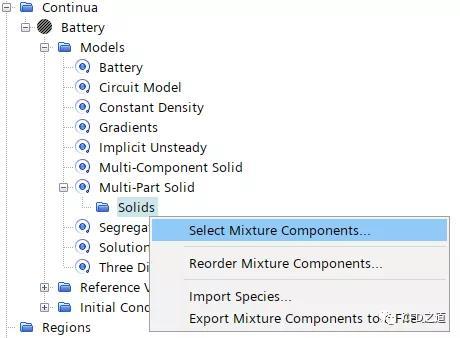
从对话框中选择材料Ag (Silver), Al (Aluminum (pure))及Cu (Copper)
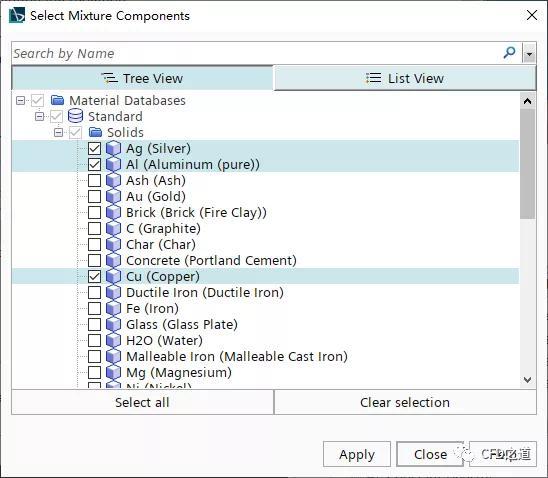
修改节点 Ag的名称为Cells,双击节点Cells > Material Properties

2.3 设置流体区物理模型
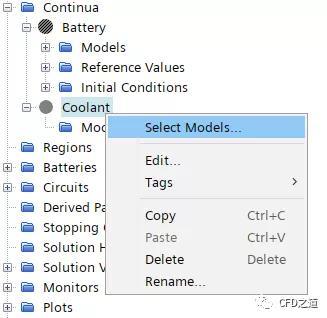
创建新的物理节点Coolant,并点击弹出菜单项Select Models… 打开模型选择对话框
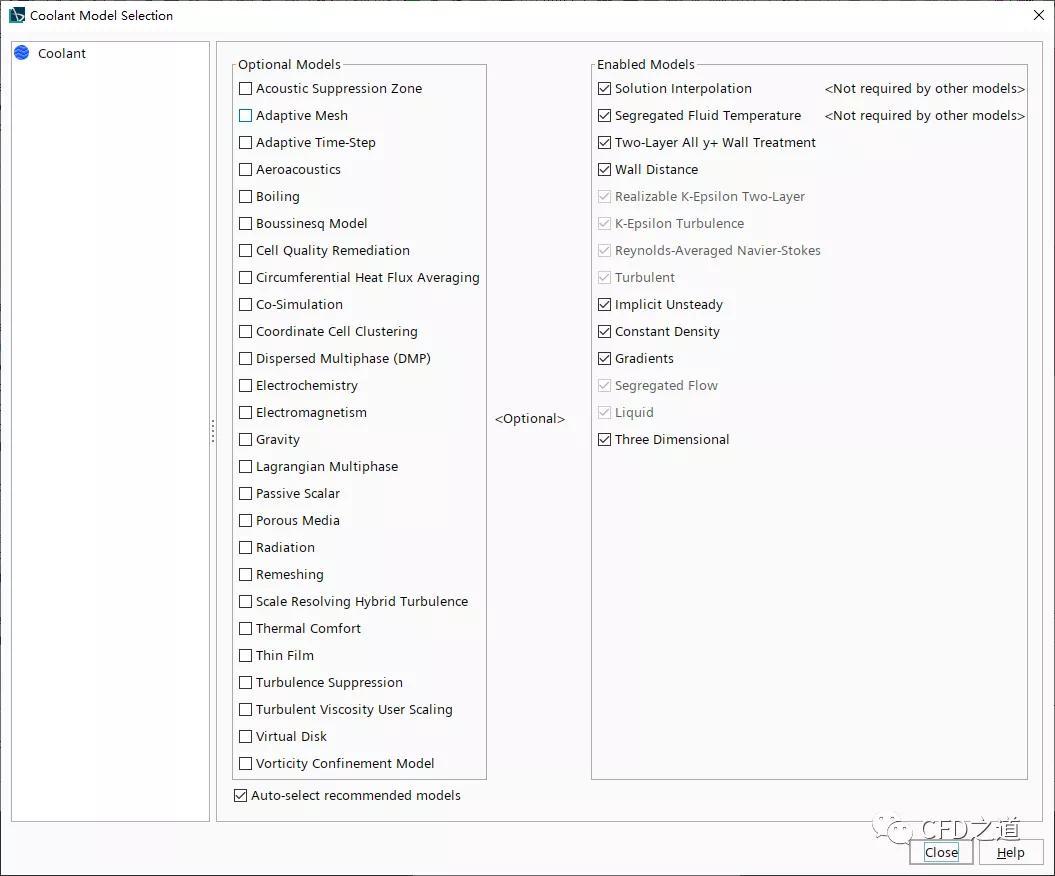
从对话框中选择以下物理模型 Three Dimensional Liquid Segregated Flow Constant Density Implicit Unsteady Turbulent K-Epsilon Turbulence Segregated Fluid Temperature Solution Interpolation
选择完毕后的模型对话框如下图所示。
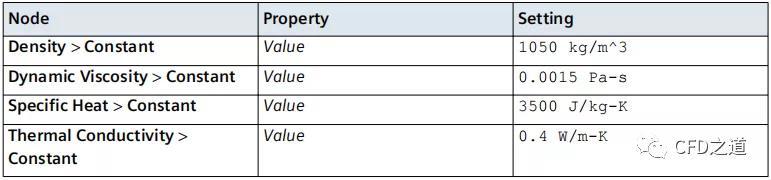
选中模型树节点Continua > Coolant > Models > Liquid > H2O,按下表所示定义介质参数
2.4 定义冷却区域
右键选择模型树节点Geometry > Parts > Coolant,点击弹出菜单项Assign Parts to Regions
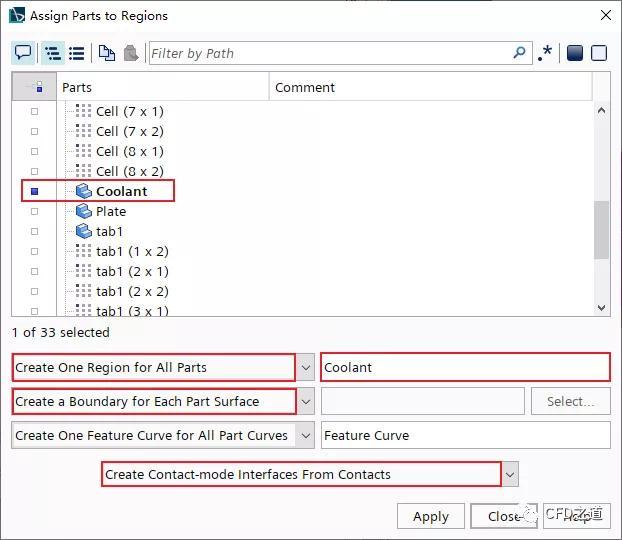
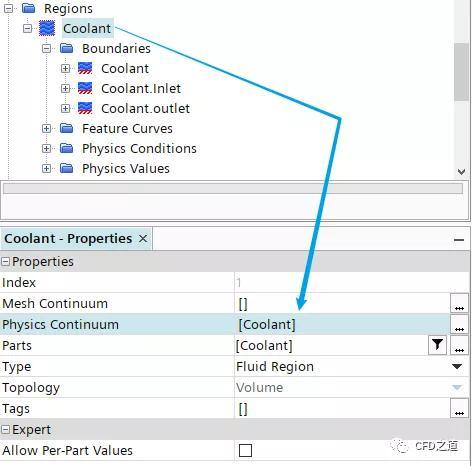
选中节点Regions > Collant,设置参数 Physics Continuum为前面创建的物理节点Coolant
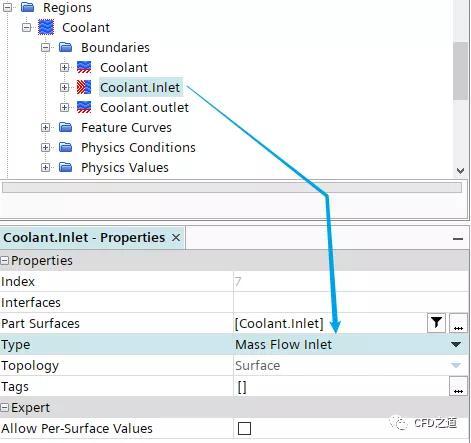
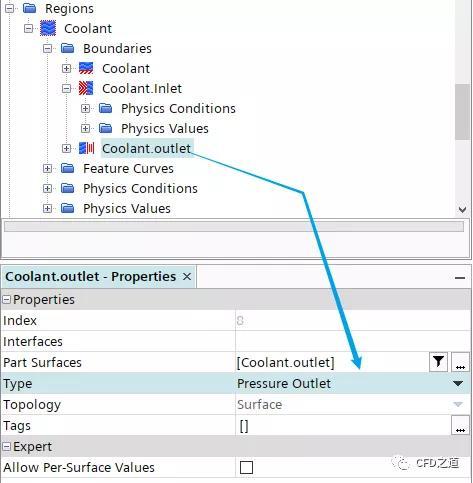
选中节点Boundaries > Coolant.Inlet,指定边界类型为Mass Flow Inlet
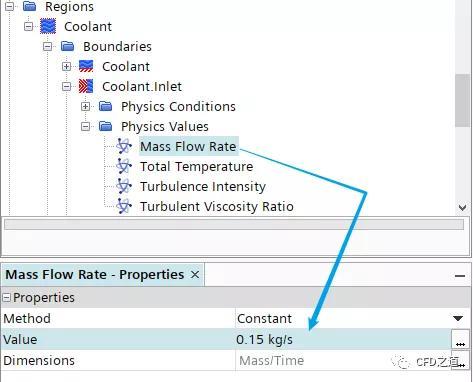
选中节点Coolant.Inlet > Physics Values > Mass Flow Rate,指定质量流量为0.15 kg/s
指定边界Coolant.outlet的边界类型为Pressure Outlet,采用默认参数
2.5 阵列几何
右键选择模型树节点Operations,点击弹出菜单项Execute All执行操作
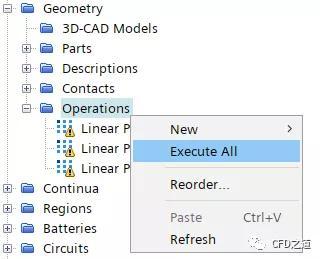
注:这里的几何操作已经提前设置好了,进行几何的阵列操作。
”
生成的几何模型如下图所示。
2.6 定义电池区域
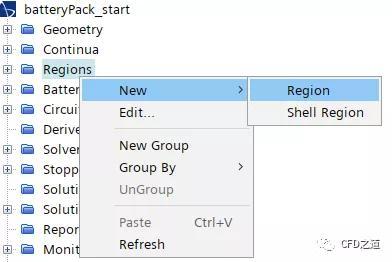
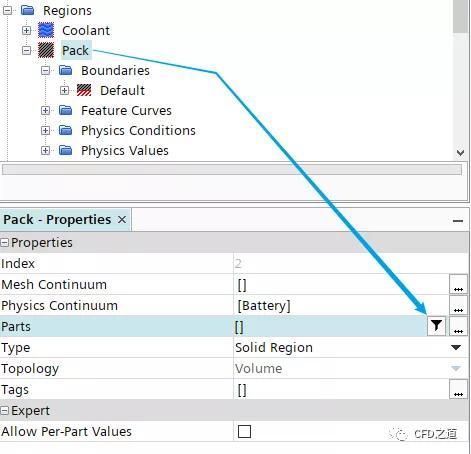
右键选择模型树节点Regions,点击弹出菜单项New → Region创建新区域并命名为Pack
选择节点Pack,如下图所示选择属性窗框中Parts右侧的筛选按钮
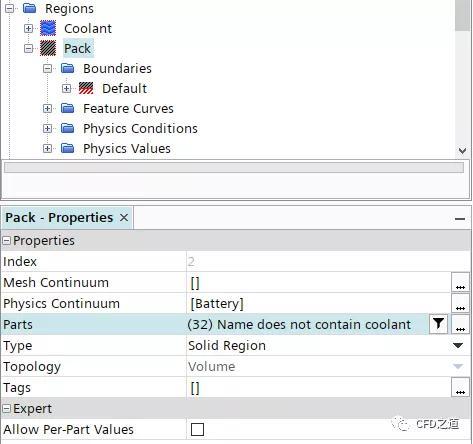
如下图所示设置筛选条件为Name does not contain coolant,这样筛选出32个结果
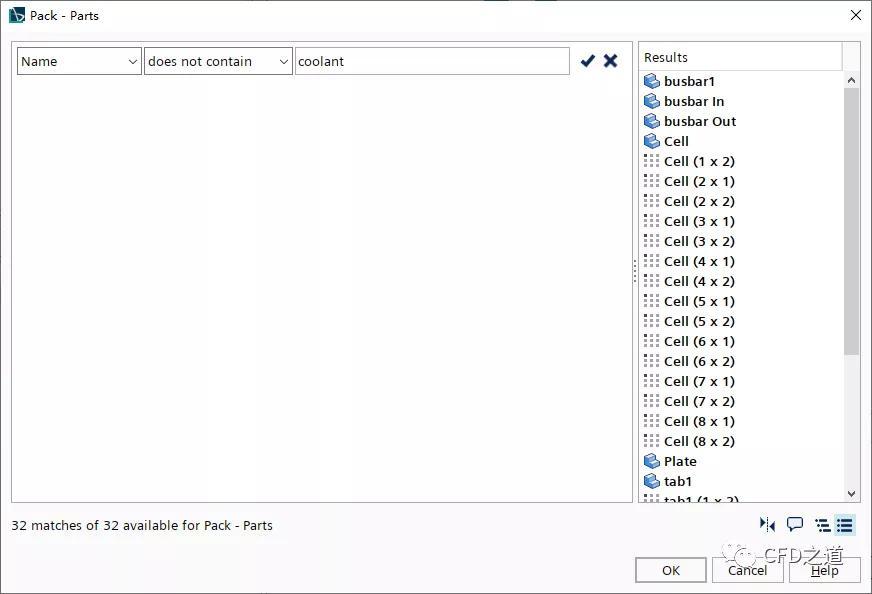
添加筛选出的结果到Parts中,如下图所示
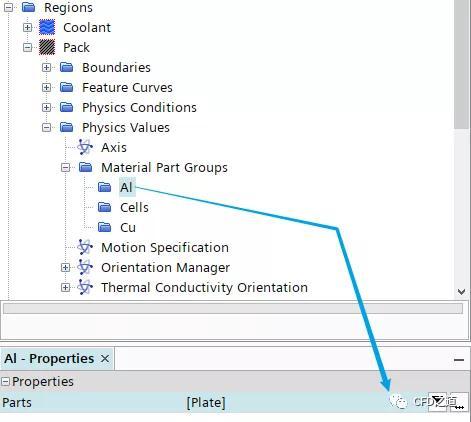
选中节点Pack > Physics Values > Material Part Groups > Al,设置Parts为Plate
选中节点Cells,点击Parts右侧的筛选选择按钮,如下图所示
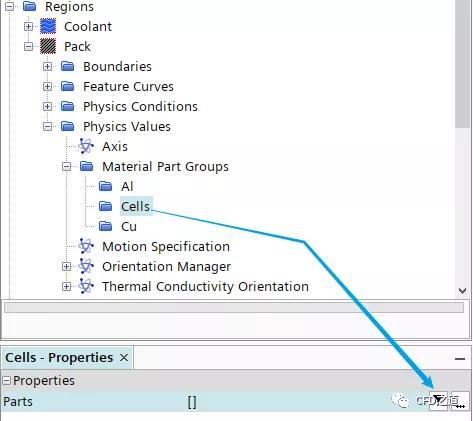
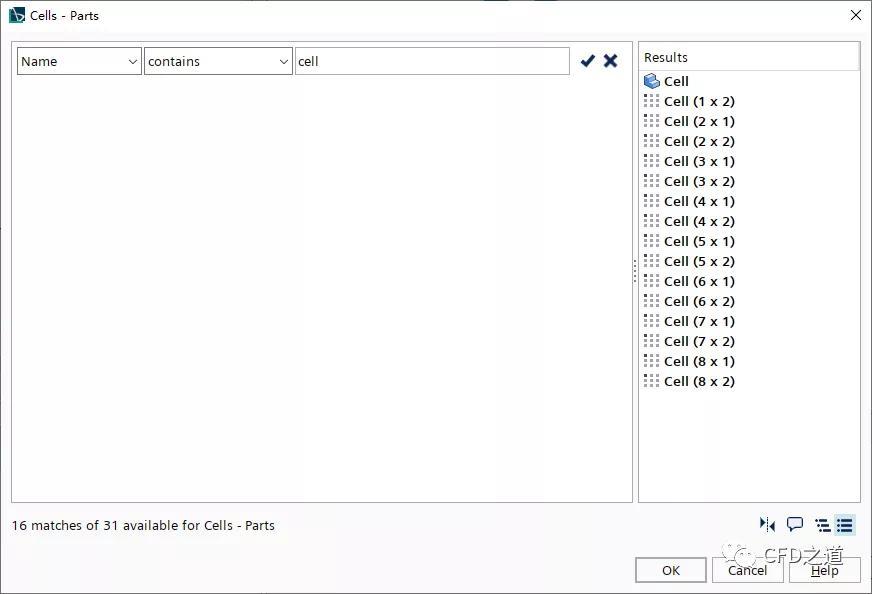
如下图所示筛选名称中带有 cell的部件,并将其添加至选择的Part中
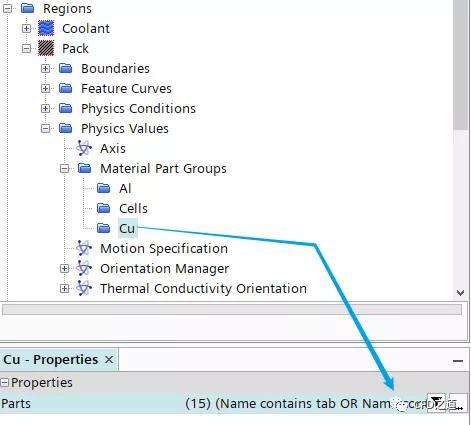
选中节点Cu,点击Parts右侧的筛选选择按钮,如下图所示
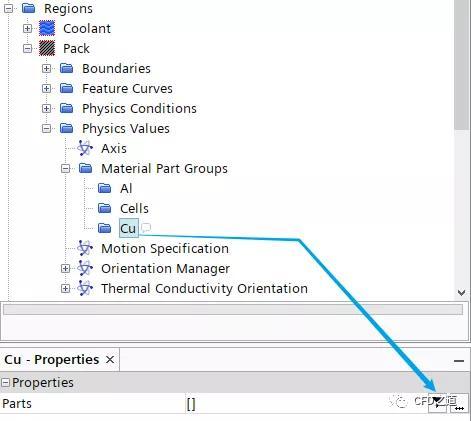
如下图设置筛选条件为名称中带有 tab或busbar的部件
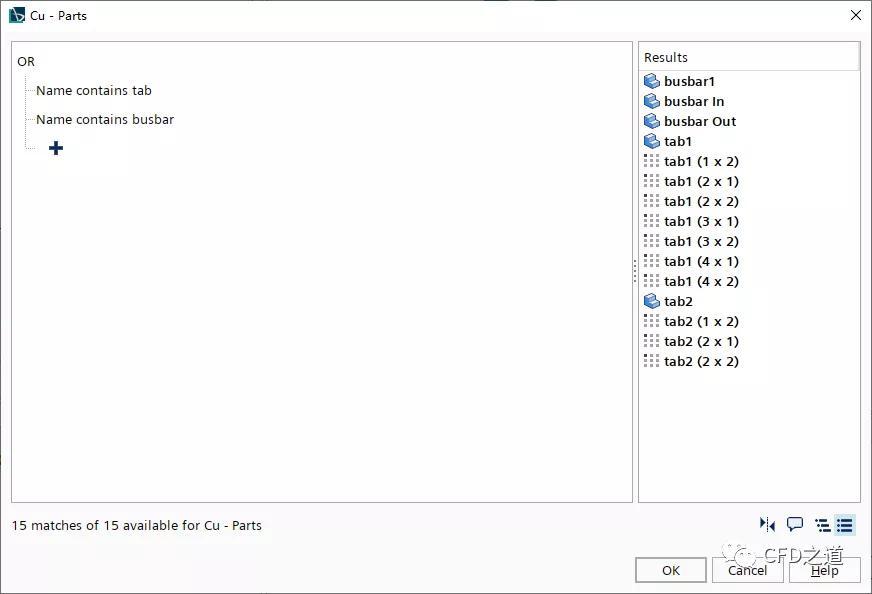
添加完毕后如下图所示
2.7 创建网格
1、创建薄层网格
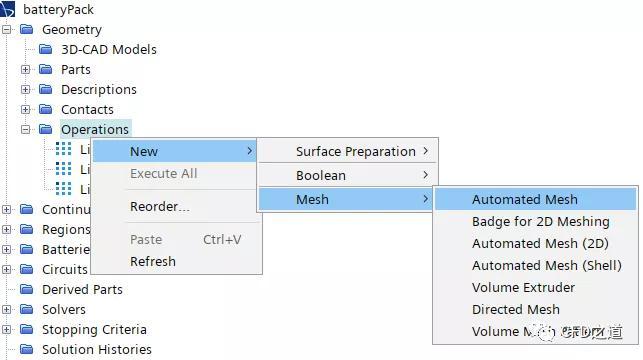
右键选择模型树节点Geometry > Operations ,点击弹出菜单项 New > Mesh > Automated Mesh添加网格生成器
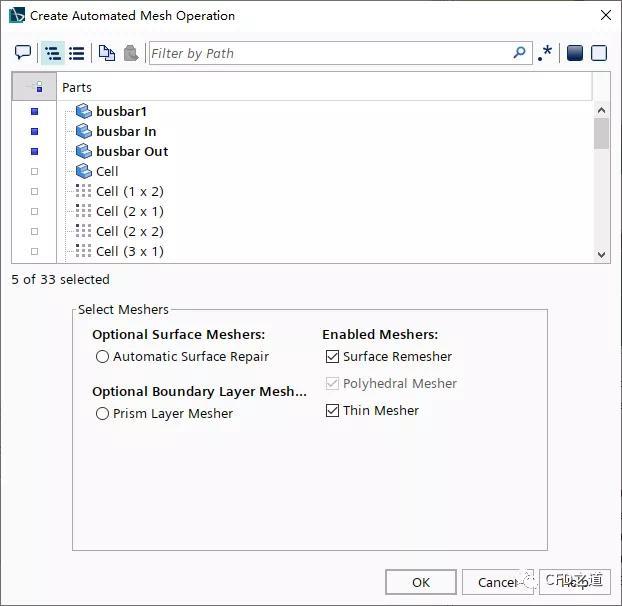
弹出的对话框中选择部件busbar1, busbar In, busbar Out, tab1, 及tab2 选择网格生成器Surface Remesher、Polyhedral Mesher及Thin Mesher,现在完毕后如下图所示
修改新创建的节点Automated Mesh名称为Automated Mesh - Thin Parts
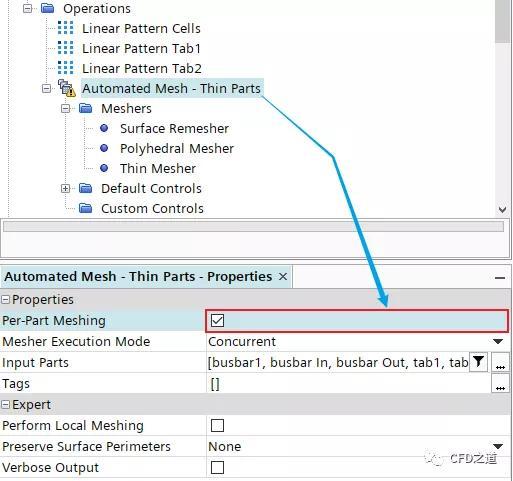
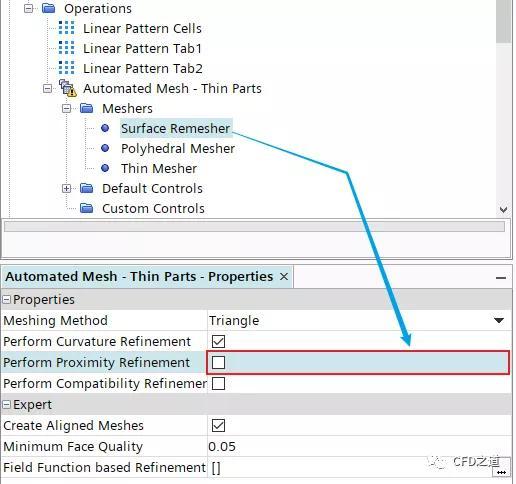
如下图所示选中节点Surface Remesher,取消选项Perform Proximity Refinement
如下表所示设置Default Controls

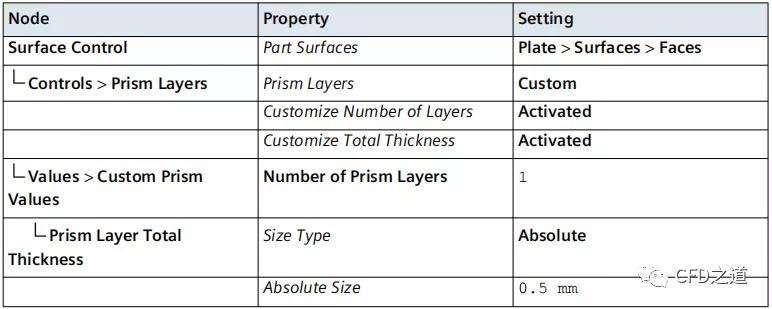
2、创建电芯的体网格
右键选择模型树节点Geometry > Operations,点击弹出菜单项New > Mesh > Automated Mesh,打开网格生成参数设置对话框 在弹出的对话框的Parts列表中中选择Cell,选择网格生成方法Surface Remesher、Polyhedral Mesher
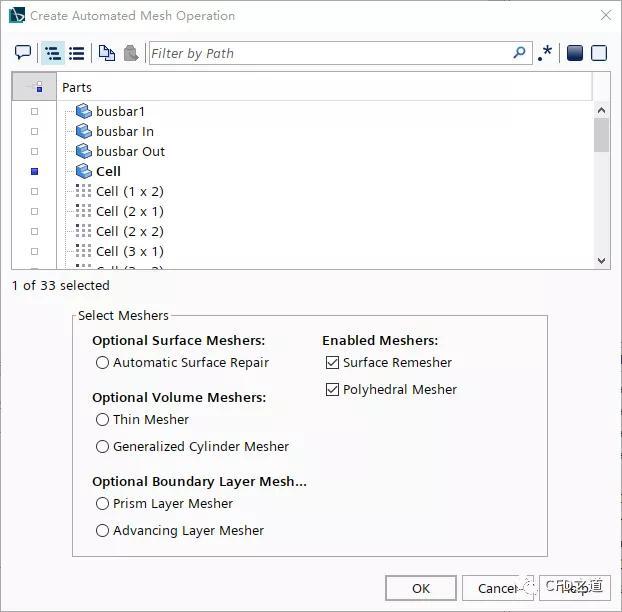 image-20211110100815275
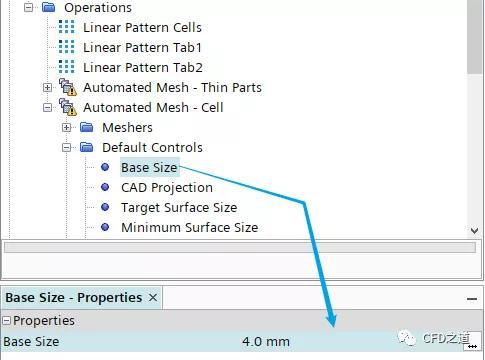
修改网格生成节点的名称为Automated Mesh - Cell 指定Base Size为4 mm
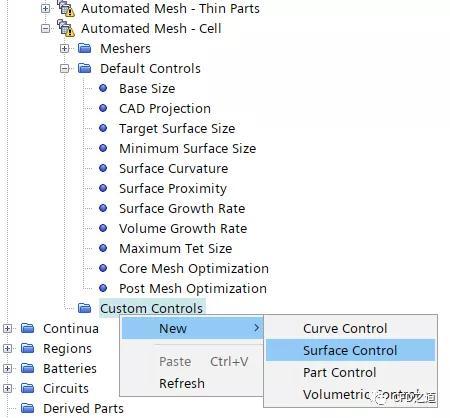
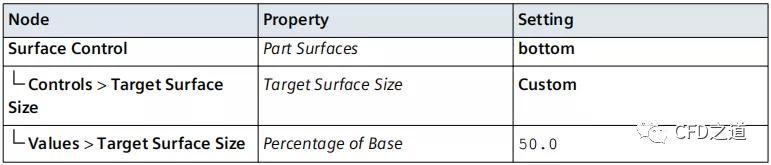
选中节点Custom Controls,点击弹出菜单项New > Surface Control新建面控制
如下表所示设置面控制参数
3、创建冷却板及流体区网格
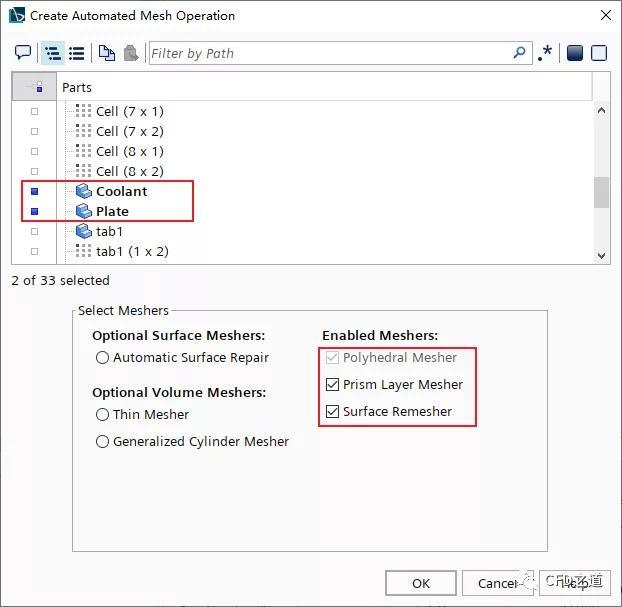
右键选择模型树节点Geometry > Operations,点击弹出菜单项New > Mesh > Automated Mesh,打开网格生成参数设置对话框 在弹出的对话框的Parts列表中中选择Coolant及Plate,选择网格生成方法Surface Remesher、Polyhedral Mesher及Prism Layer Mesher
修改节点名称为Automated Mesh - Cooling,并指定网格生成方式为Parallel采用并行方式生成网格
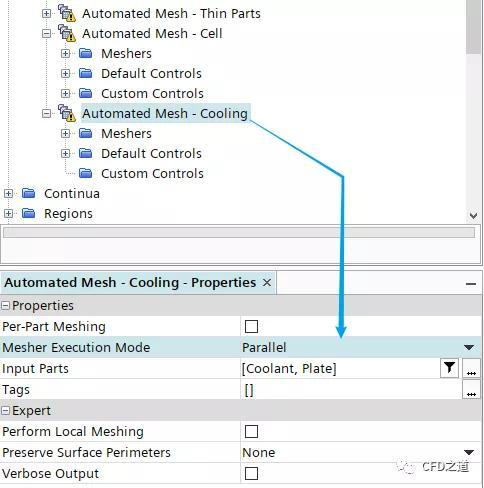
注:当网格数量较多时,可以选择使用并行方式生成网格。
”
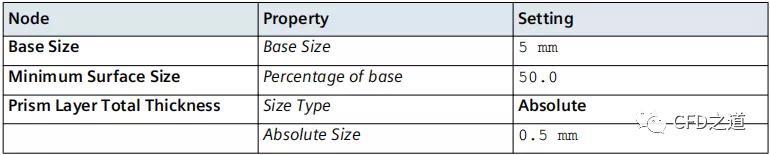
如下表所示设置Default Controls
右键选择节点Custom Controls 并点击弹出菜单项New > Surface Control,应用下表所示参数
4、创建创建cell及tab的网格
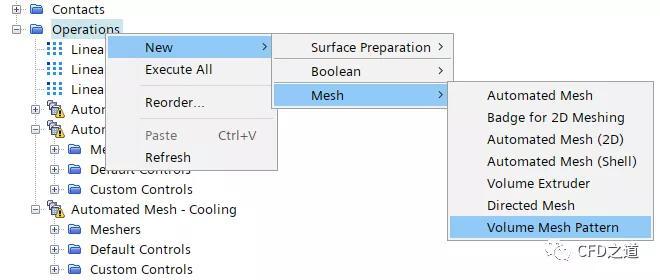
右键选择模型树节点Geometry > Operations ,点击弹出菜单项New > Mesh > Volume Mesh Pattern
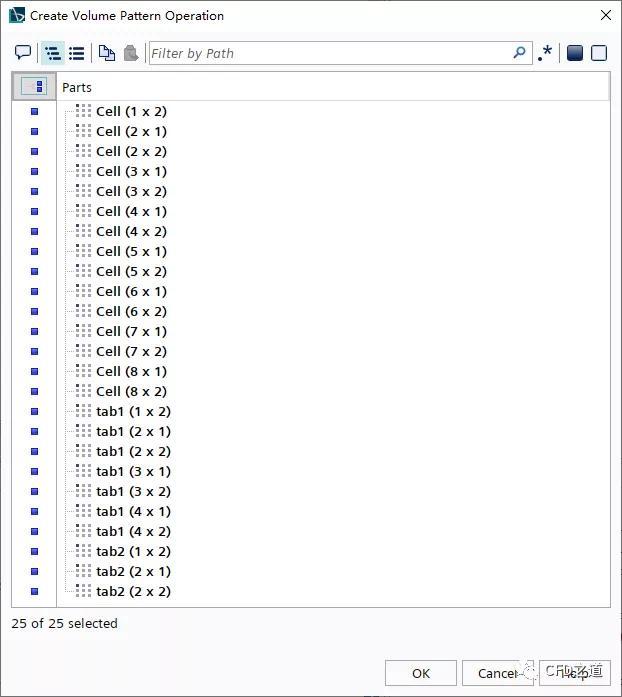
如下图所示选择列表中的所有Parts,点击OK按钮关闭对话框
5、创建接触
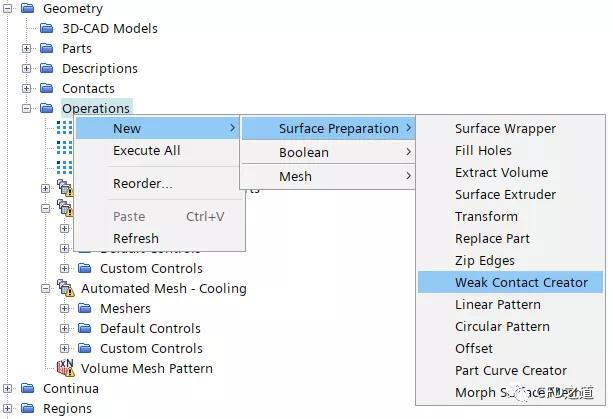
右键选择模型树节点Operations,点击弹出菜单项New → Surface Preparation → Weak Contact Creator
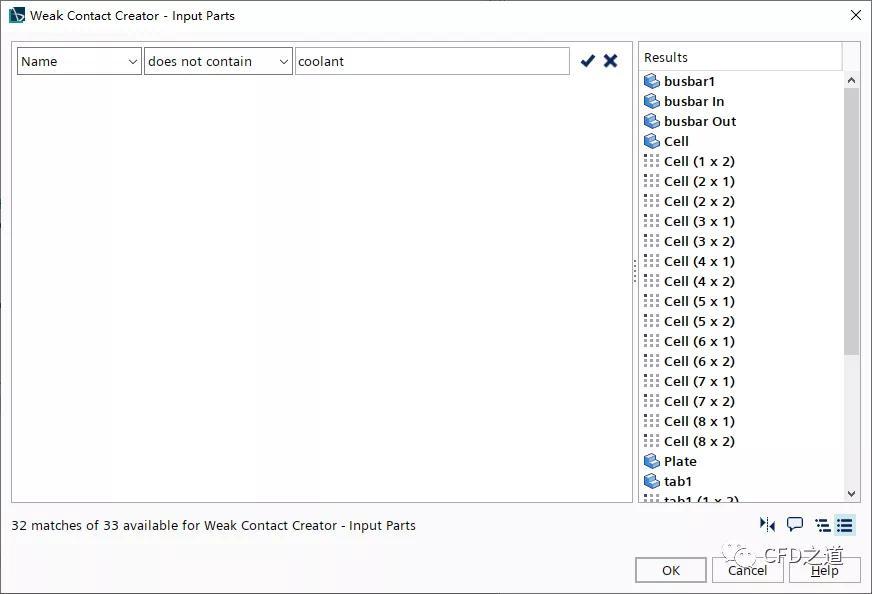
选中新创建的节点 Weak Contact Creator,点击Input Parts右侧的筛选选择按钮打开筛选对话框
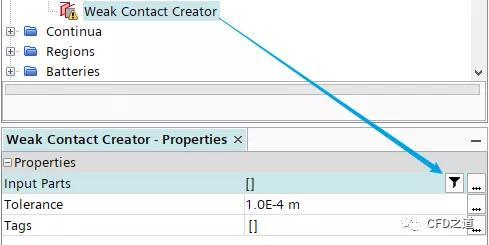
如下图所示设置筛选条件为Name does not contain coolant,将筛选到的32个部件添加到Input Parts中
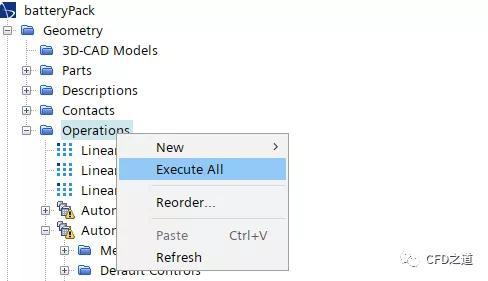
右键选择节点Operations,点击弹出菜单项Execute All生成计算网格
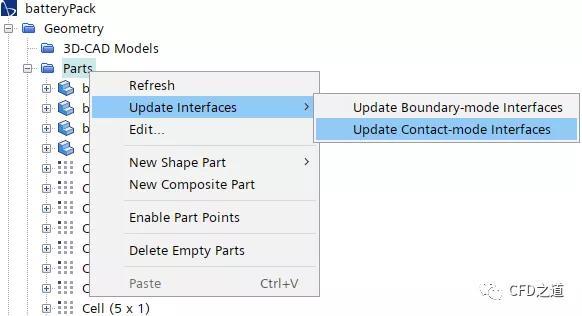
右键选择模型树节点Parts,点击弹出菜单项Update Interfaces > Update Contact-mode Interfaces创建交接面
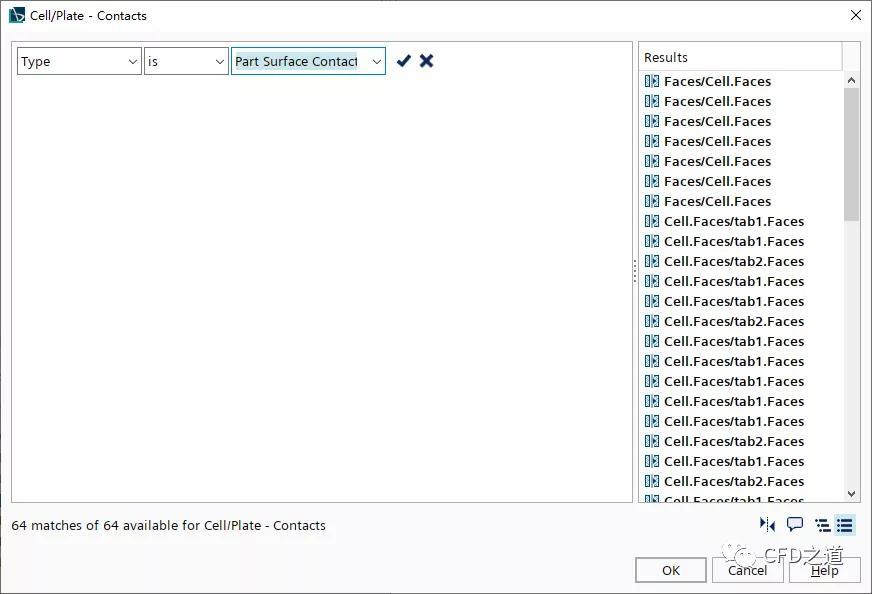
选中节点Interfaces > Cell/Plate,点击如下图所示的筛选选择按钮,打开筛选对话框
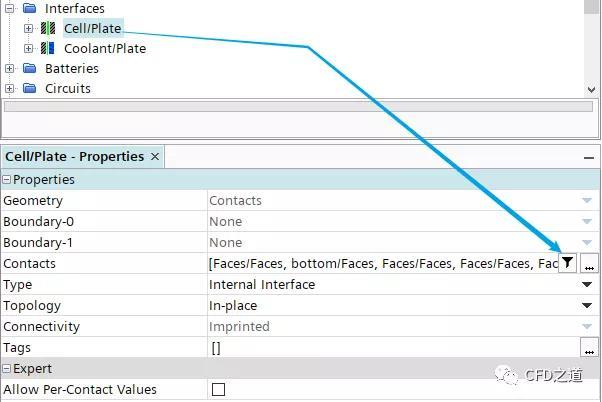
设置筛选条件为Type is Part Surface Contact,添加筛选得到的64个部件
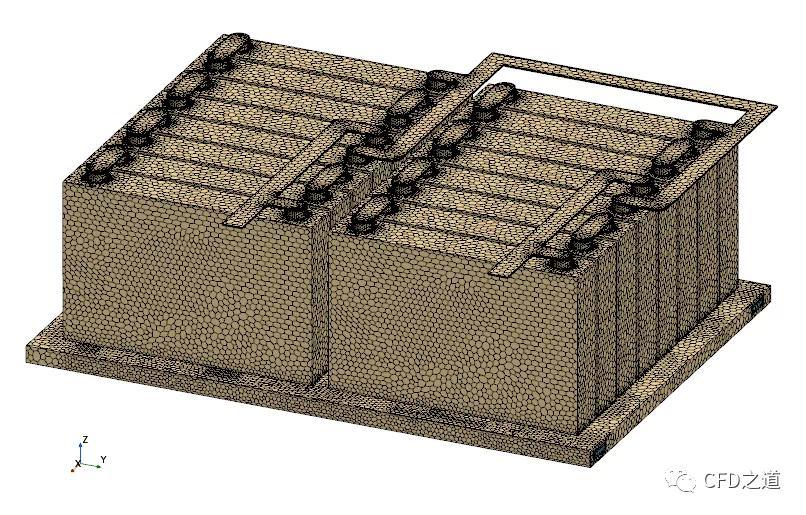
生成的计算网格如下图所示。
2.8 配置电池参数
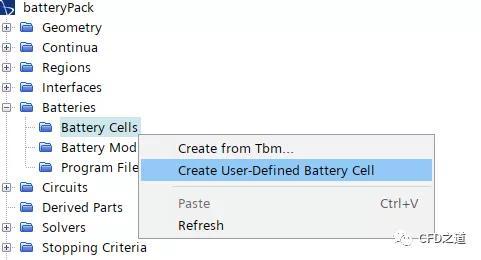
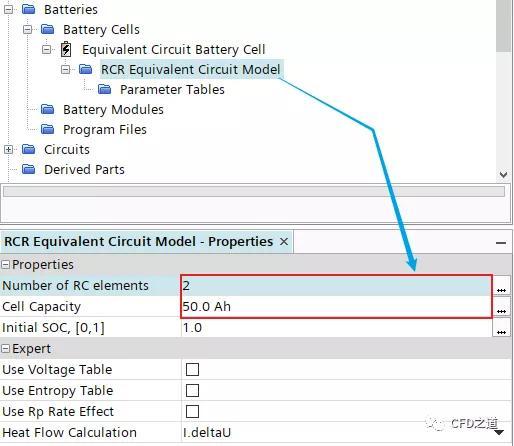
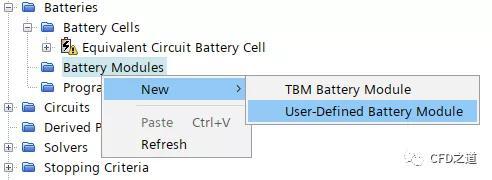
右键选择模型树节点Batteries > Battery Cells,点击弹出菜单项Create User-Defined Battery Cell.
点击新创建的节点RCR Equivalent Circuit Model,设置Number of RC element为2,设置Cell Capacity为50 Ah
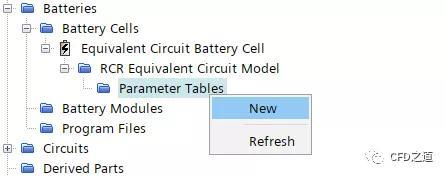
右键选择模型树节点Equivalent Circuit Battery Cell > RCR Equivalent Circuit Model > Parameter Tables,点击弹出菜单项New
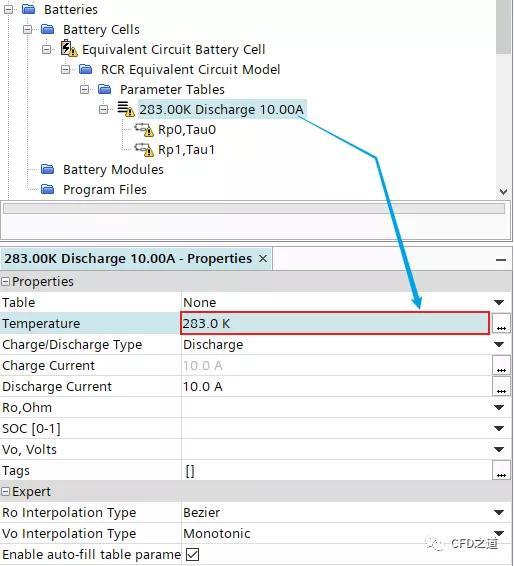
选择节点Parameter Tables > 273.15K Discharge 10.00A,修改Temperature为283 K,此时节点名自动更改为283K Discharge 10.00A
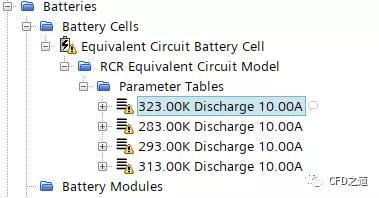
相同方式创建 293K, 313K及323K,创建完毕后如下图所示
同时选中上面创建的4个节点,属性窗口中如下图所示设置 设置Charge/Discharge Type为Both 设置Charge current为18.75 A 设置Discharge current为18.75 A

2.9 定义电池模型
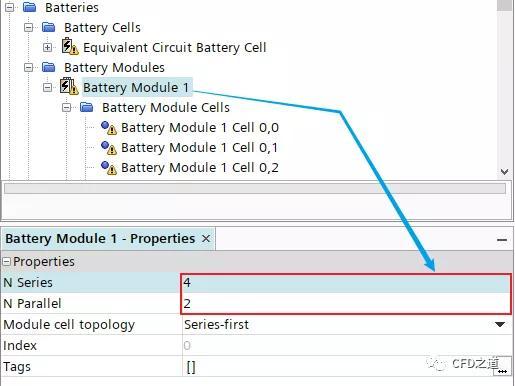
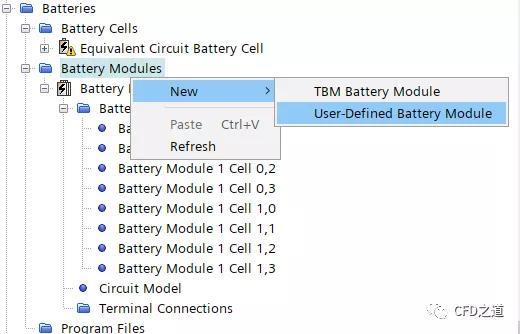
右键选择节点Batteries > Battery Modules点击右键菜单项New > User-Defined Battery Module创建新节点
修改节点 Batteries > Battery Modules > Battery Module的名称为Battery Module 1 选中节点Battery Module 1,指定N Series为4,指定N Parallel为2
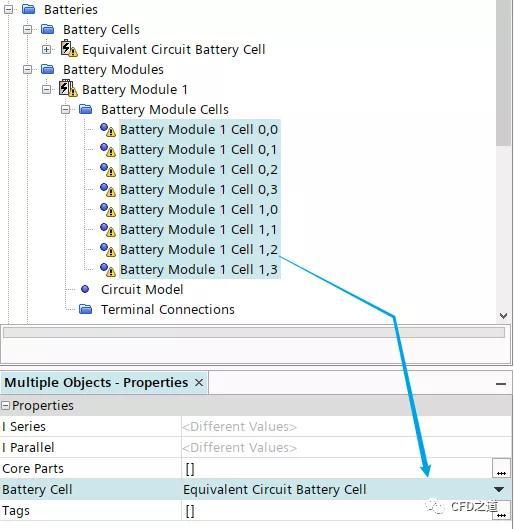
选中节点Battery Module 1 > Battery Module Cells下的所有子节点,设置Battery Cell为Equivalent Circuit Battery Cell
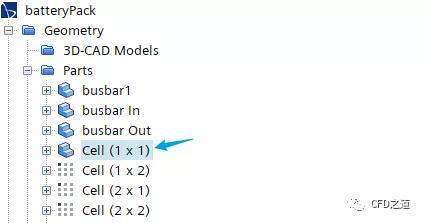
修改节点Geometry > Parts > Cell 名称为Cell (1 x 1)
注:因为后面要用到名称进行匹配,因此这里的节点名字不要写错。
”
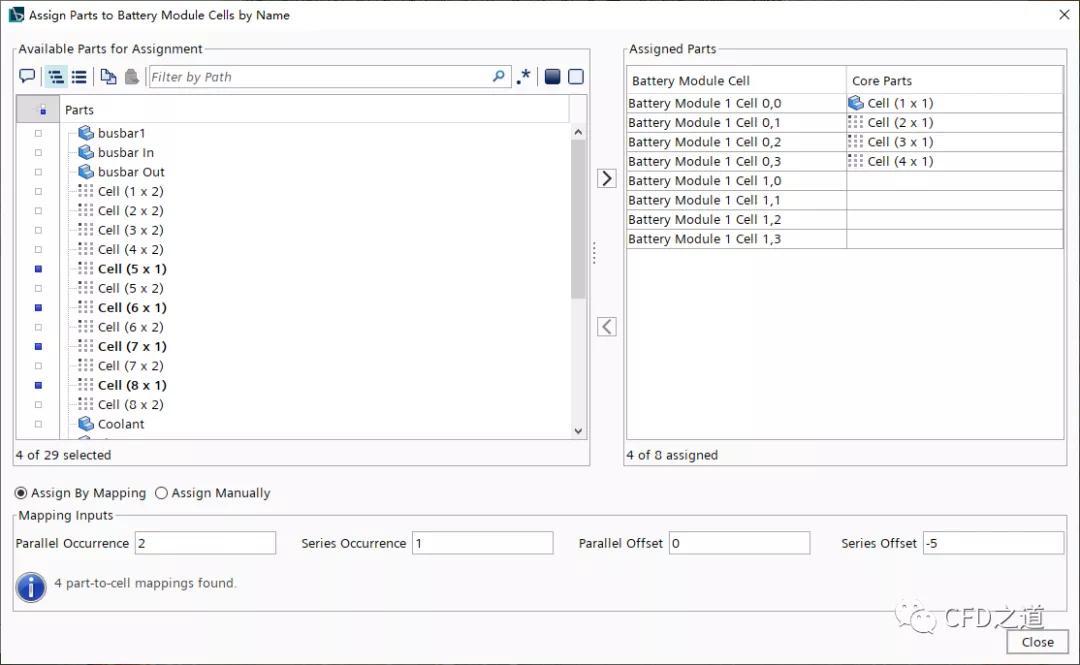
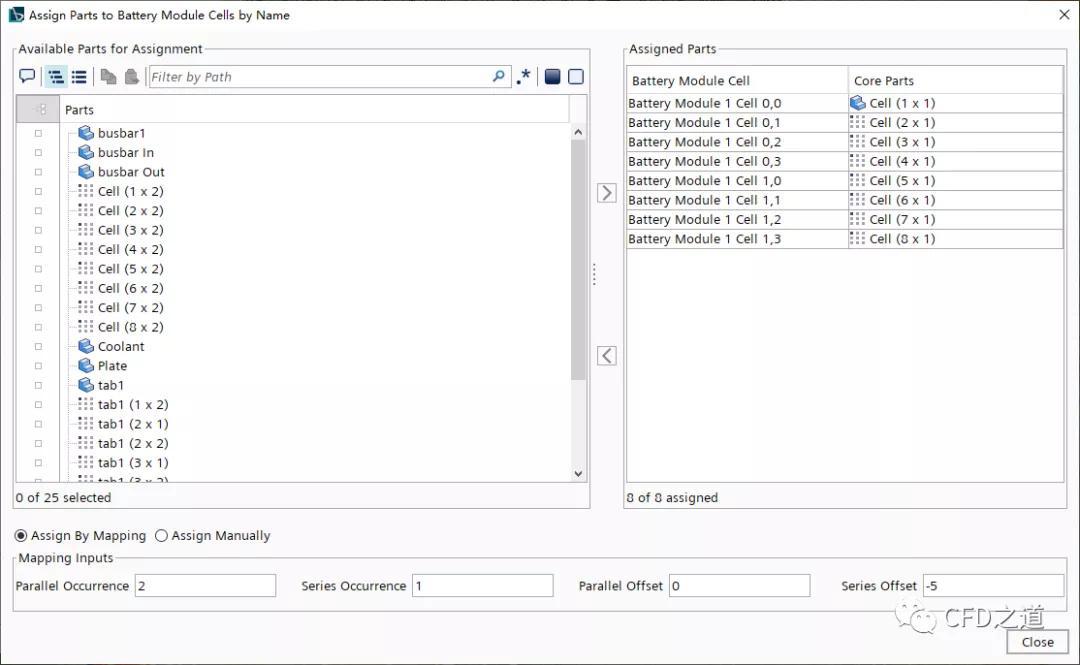
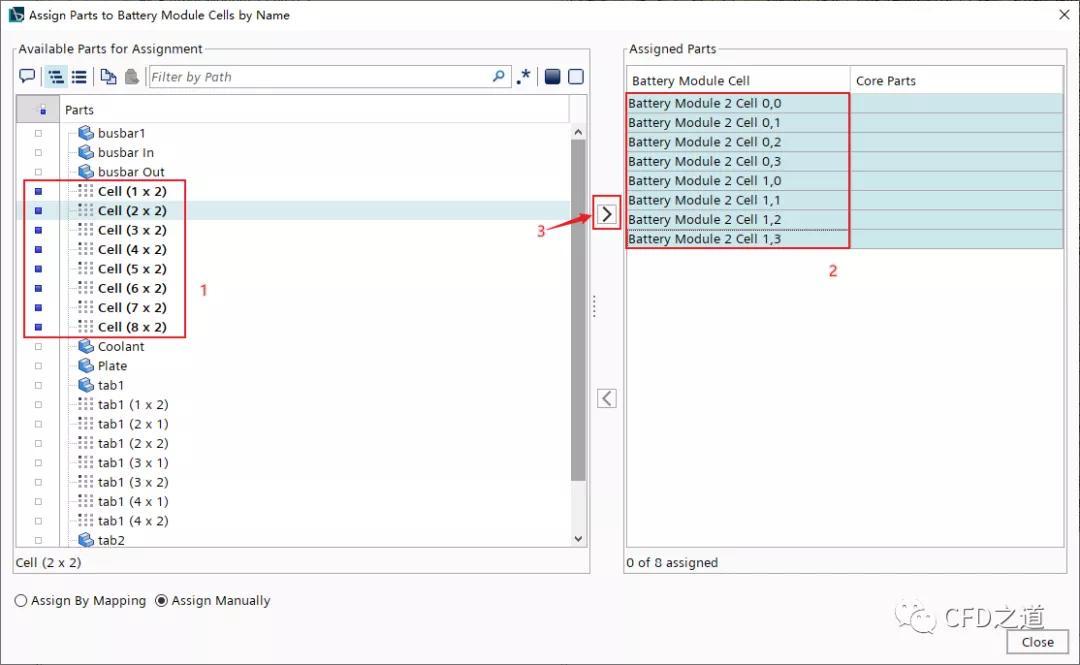
右键选择模型树节点Battery Module 1 ,点击弹出菜单项 Assign Parts to Battery Module Cells by Name
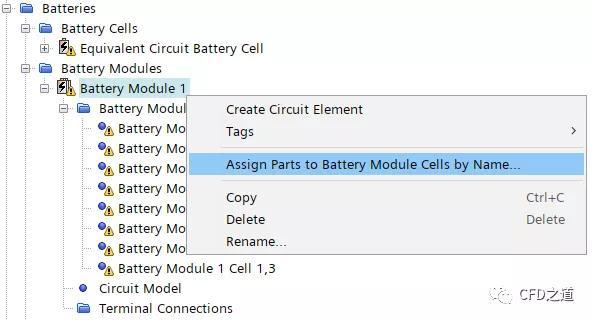
弹出的对话框中如下图所示设置

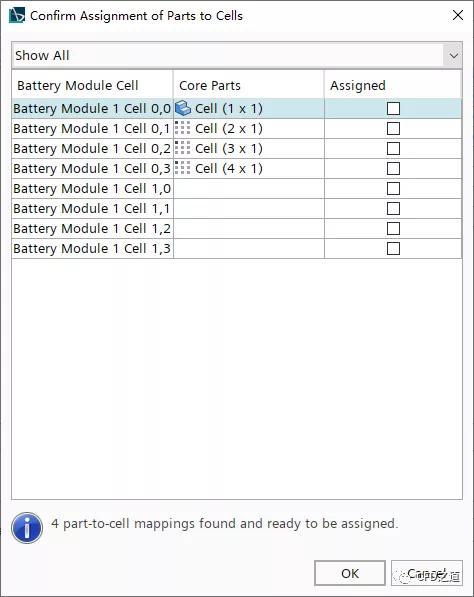
设置完毕后如下图所示
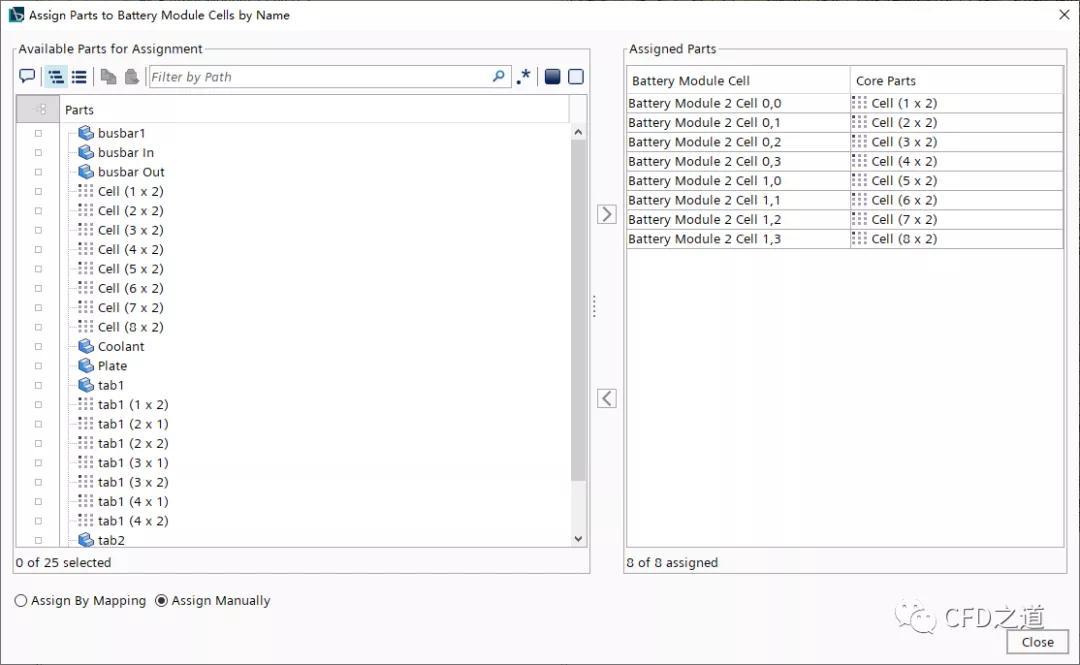
自动匹配的规则如下图所示。

设置另外4个电芯的连接方式
匹配完毕后如下图所示
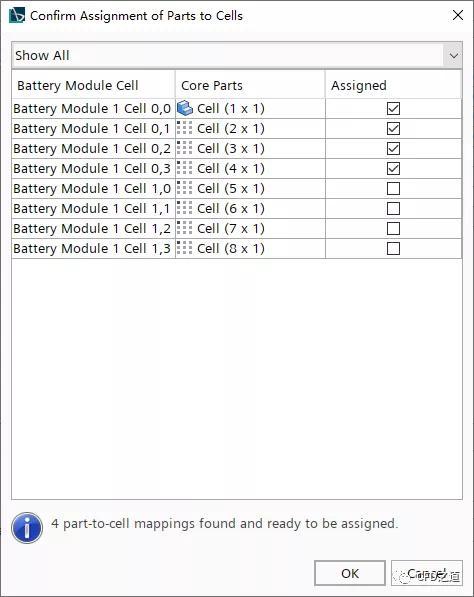
指定完毕后的对话框如下图所示。
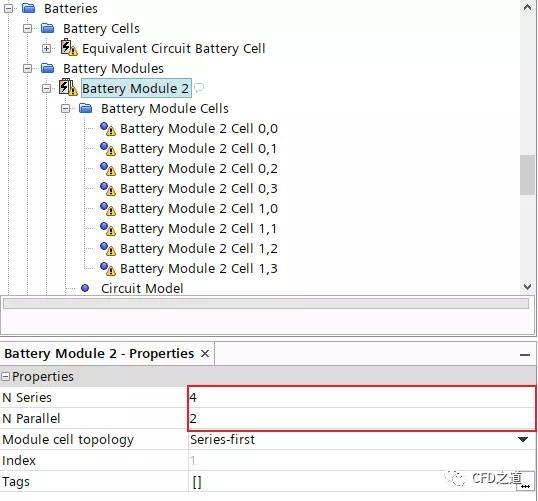
相同方式创建另一个电池模组Battery Module 2
指定其为4串2并,如下图所示
右键选中上一步创建的节点Battery Module 2,点击弹出菜单项Assign Parts to Battery Module Cells by Name…
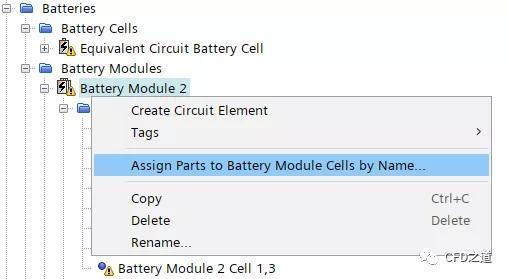
如下图所示进行操作
添加完毕后如下图所示。
如下图所示设置所有的电池节点

2.10 创建电路
如下图所示,同时选中节点Battery Module 1及Battery Module 2,点击右键菜单Create Circuit Element

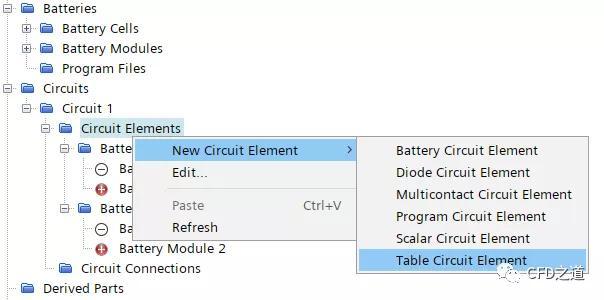
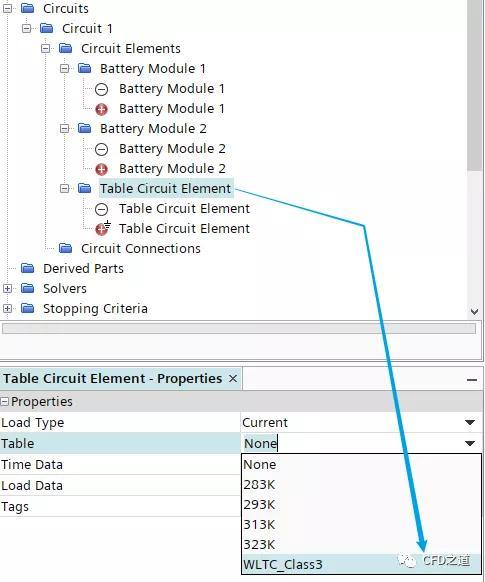
右键选择模型树节点Circuits > Circuit 1 > Circuit Elements,点击弹出菜单项New Circuit Element > Table Circuit Element
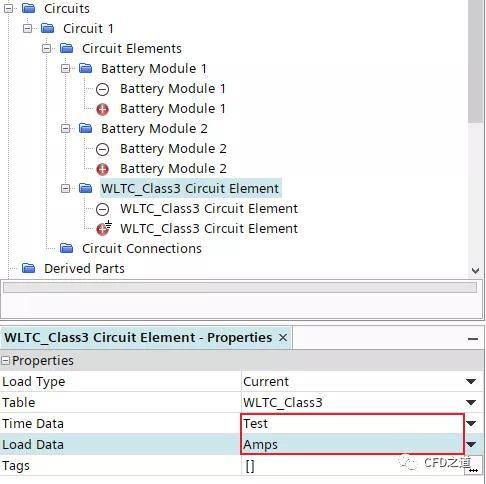
选中新创建的节点Table Circuit Element,设置Table为WLTC_Class3
选择节点WLTC_Class3 Circuit Element,设置Time Data我Test,指定Load Data为Amps
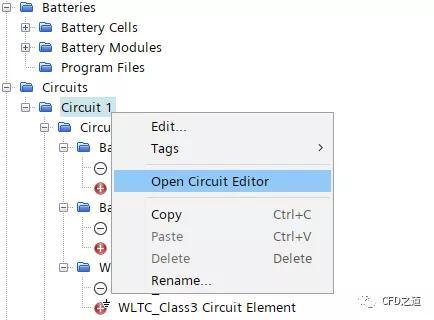
选中节点Circuit 1,点击弹出菜单项Open Circuit Editor
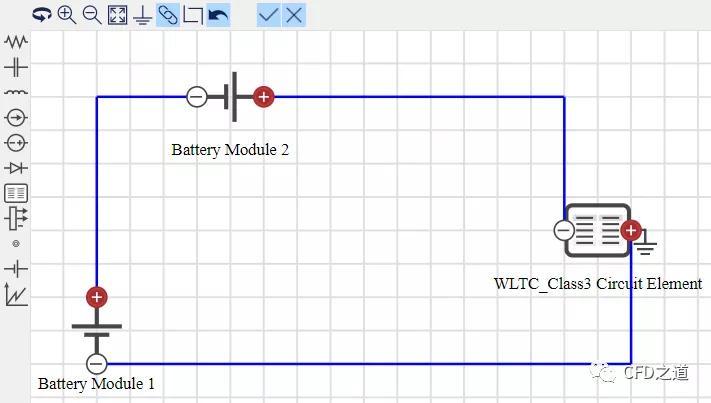
在弹出的电路设计面板中创建如下图所示的电路,这里表示的是两个模组串联
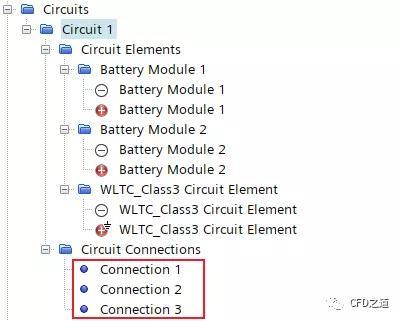
电路创建完毕后,可以查看Circuit Connections节点,如下图所示,可以看到增加了3个连接。
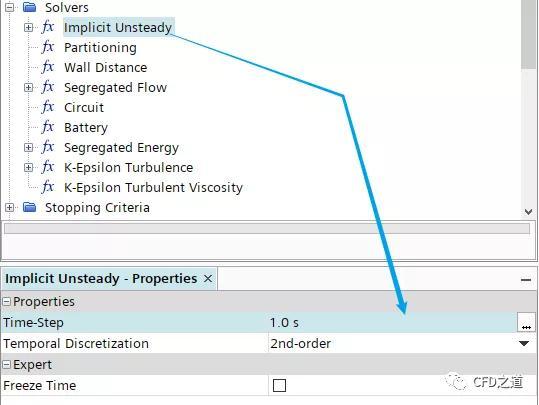
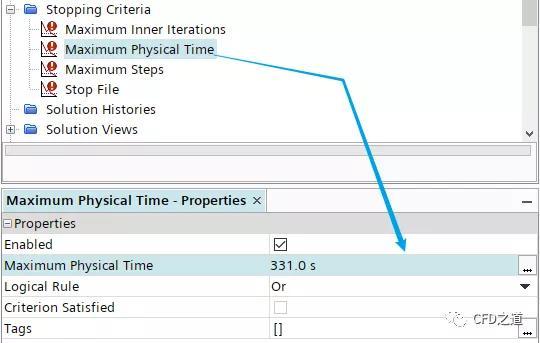
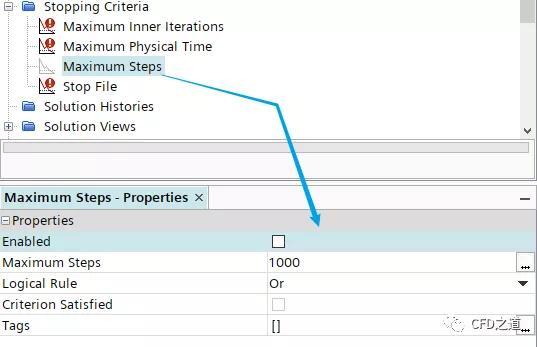
2.11 设置求解参数
指定时间步长为1 s
指定最大物理时间为331 s
取消激活Maximum Steps
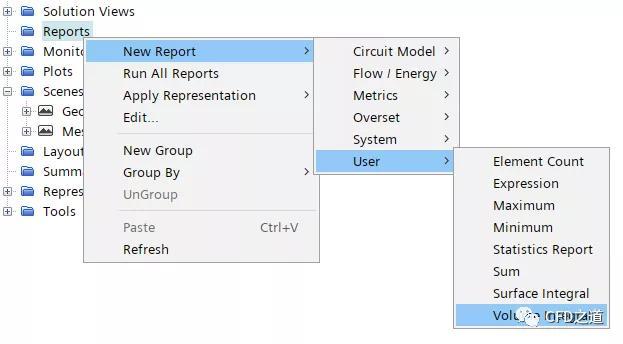
2.12 设置测报告
1、所有电芯的总体积热
如下图所示创建Volume Integral报告
指定场函数为Battery Volumetric Heat,选择Parts为名称中包含cell的所有部件
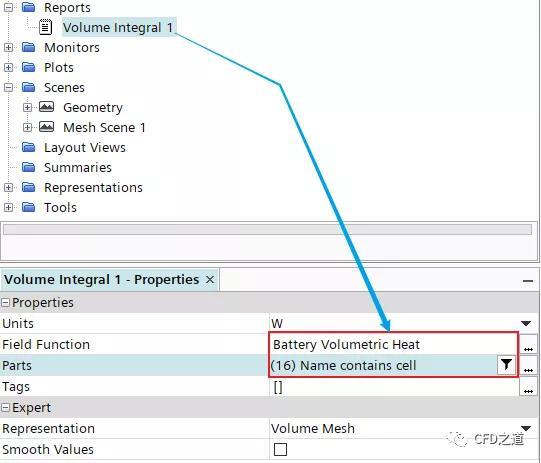
修改节点名称为Volume Integral Battery Heat
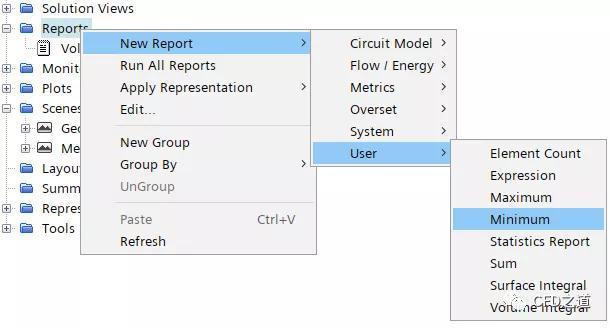
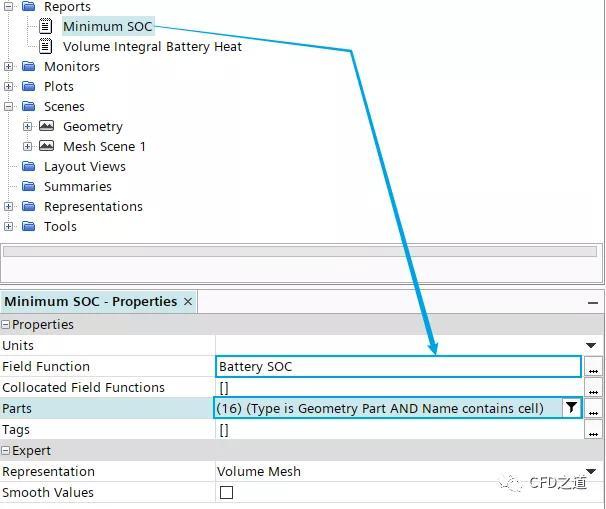
2、最小SOC
右键选择Reports,点击弹出菜单项New Report > User > Minimum,创建新节点并命名为Minimum SOC
指定场函数为Battery SOC,指定部件为名称中包含cell的所有几何部件
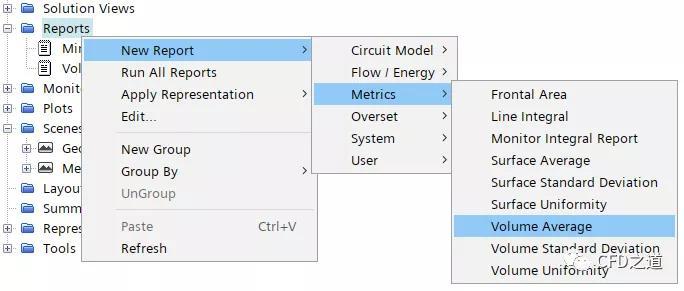
3、体积平均温度
选中节点Reports,点击右键菜单项New Report > Metrics > Volume Average创建节点Volume Average Cell Temperature
如下表所示选择监测的物理量与部件

4、电压
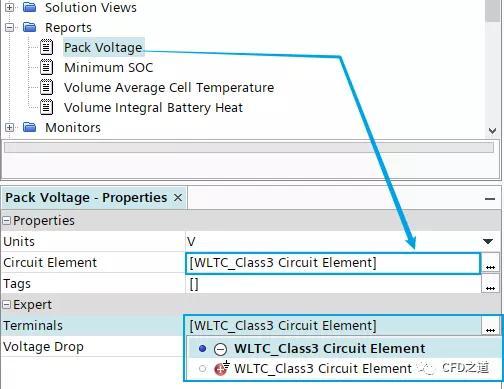
选中节点Reports,点击右键菜单项New Report > Circuit Model > Circuit Element Voltage创建节点Pack Voltage
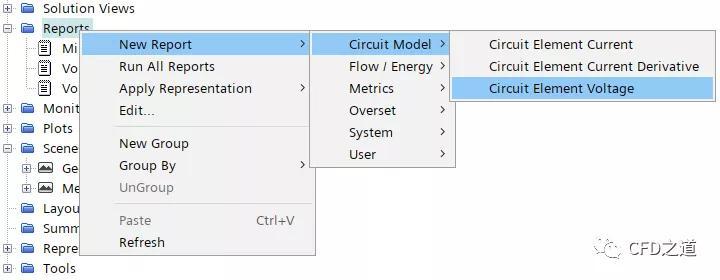
如下图所示选择监测对象
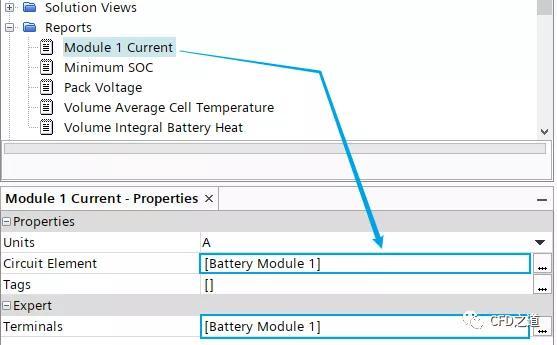
5、模组1的电流
选中节点Reports,点击右键菜单项New Report > Circuit Model > Circuit Element Current创建节点Module 1 Current
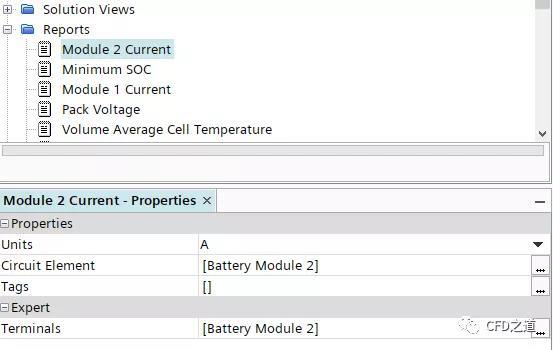
6、模组2的电流
选中节点Reports,点击右键菜单项New Report > Circuit Model > Circuit Element Current创建节点Module 2 Current
2.13 创建监测
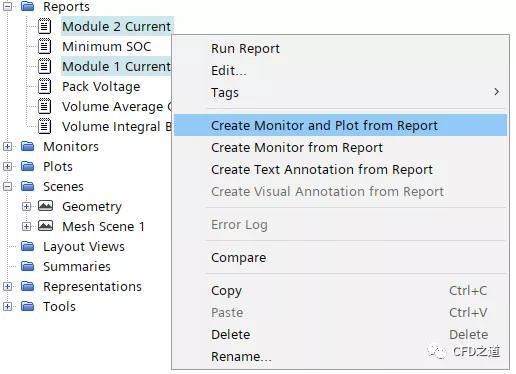
选中节点Module 1 Current及Module 2 Current,点击右键菜单项Create Monitor and Plot from Report
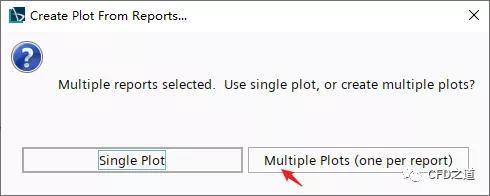
选择Single Polt

如下图创建其他的绘图
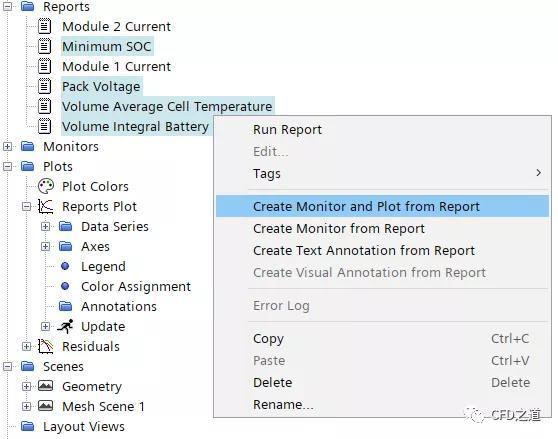
选择Multiple Plots
2.15 创建scene
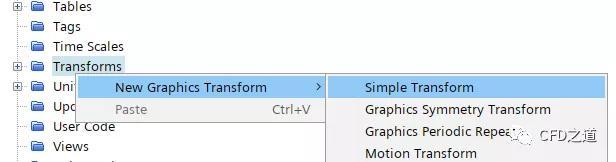
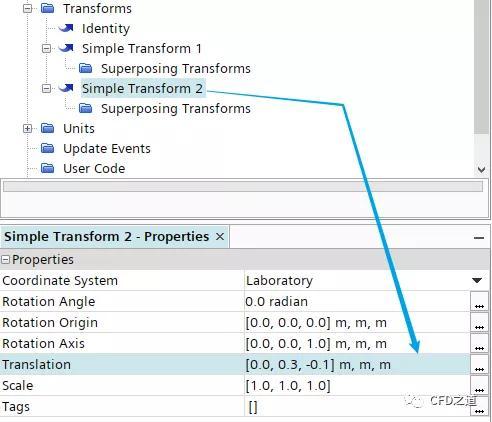
右键选择节点Transforms,点击弹出菜单项New Graphics Transform > Simple Transform
设置Translation为**[0.25,0,0]**

创建另一个Simple Transform,设置Translation为[0,,0.3,-0.1]
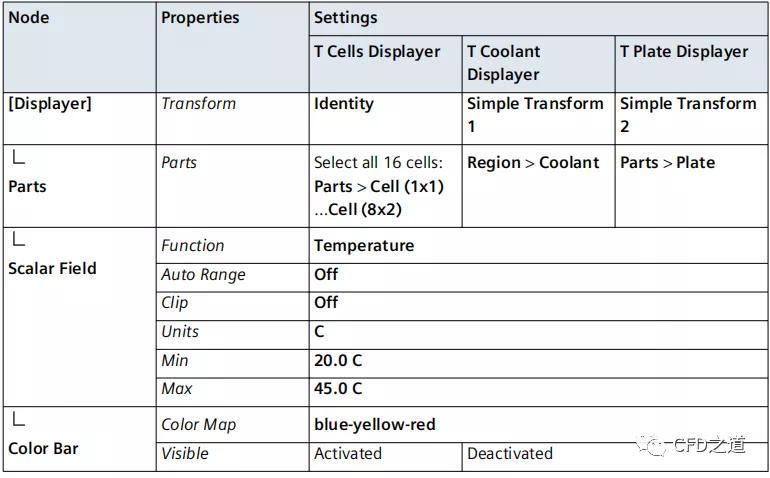
新建Scalar,命名为Temperature
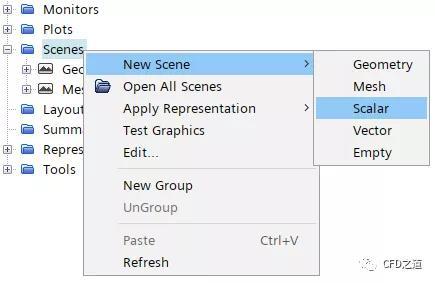
右键选择节点Scenes > Temperature,点击弹出菜单项New Displayer > Scalar
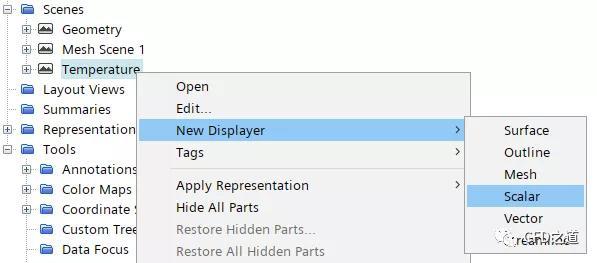
相同方式创建其它两个Scalar,最后的Scalar如下表所示

鼠标双击节点Outline 1前的图标,隐藏显示几何轮廓
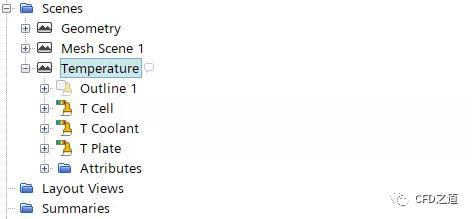
对各子节点进行如下图所示设置
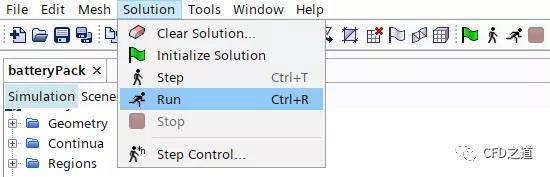
2.14 进行计算
点击菜单项Solution → Run进行计算
3 计算结果
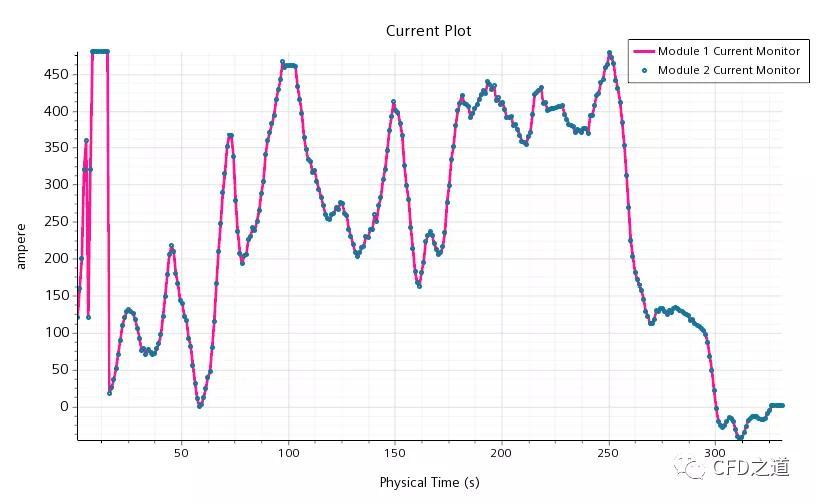
两个模组的电流监测值
电压监测值

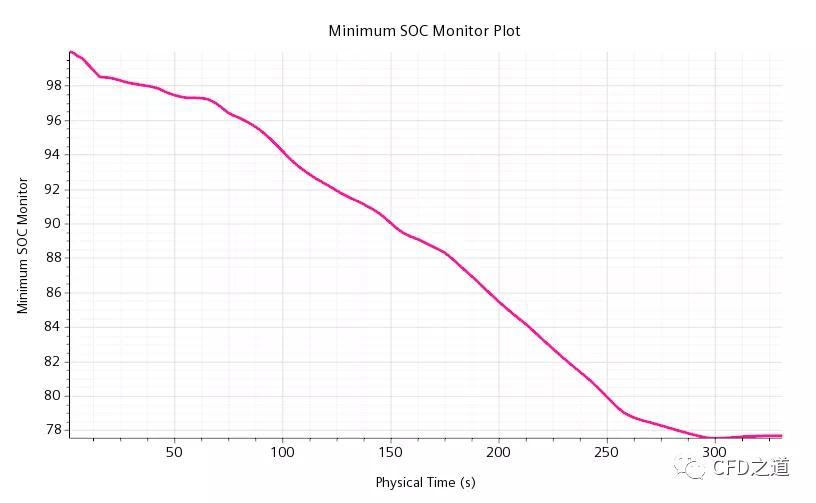
SOC检测值
平均温度监测值

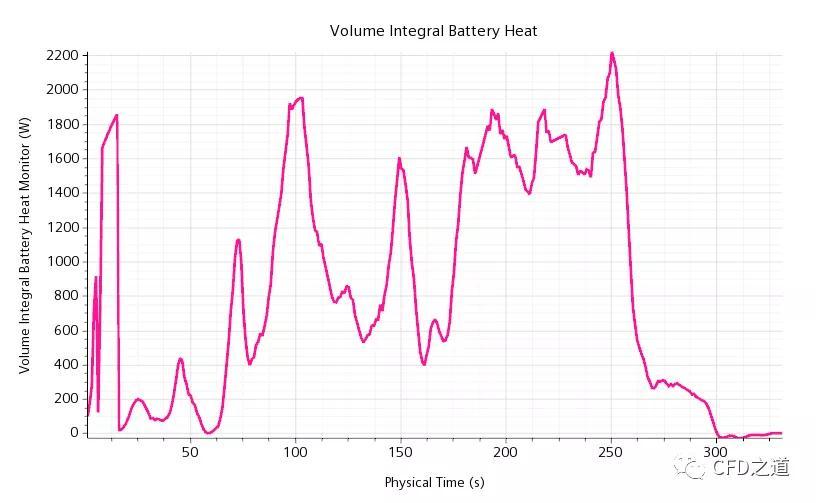
热功率监测值
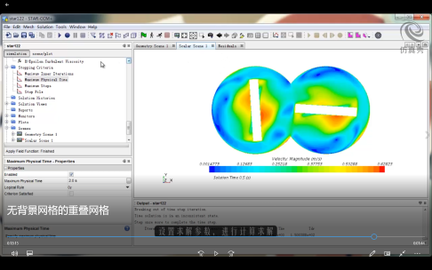
温度随时间变化
真真的又臭又长,设置过程实在是太麻烦了。
注:本案例取自STAR CCM 2021.3随机案例
文章来源:CFD之道
课程推荐