NFX|装配体(Assembly)分析
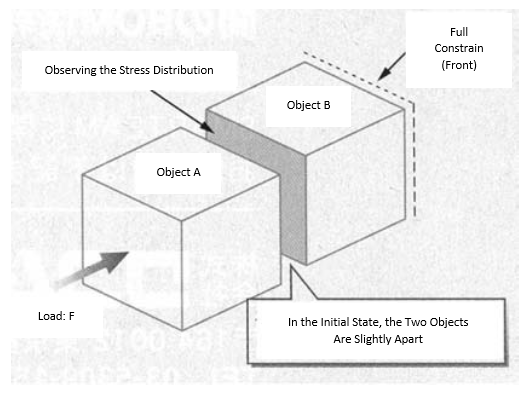
Most products are composed of several parts, so assembly analysis should be performed to verify the strength of those final products. In this article, how to set and perform assembly analysis will be explained. Unlike the analysis of single parts, this type of analysis requires establishing boundary conditions such as coupling and contact between parts of the assembly. Also, when creating the mesh, one must take into account specific elements of contact. First, let’s briefly introduce the various methods by which parts come into contact, that is, the setting of contact conditions (Fig. 1). In the case of bonding two parts together, face bonding, node bonding and joint bonding are commonly used; we will focus here only on face and node bonding.Figure 1: Classification of Main Contact Conditions The first thing to consider when setting contact conditions is whether the parts are in contact or separate in their initial state. It should be noted that even if parts are separated initially, they might come into contact due to deformation or movement. The next thing to consider is the presence of slippage between parts in the contact area; whether the parts are completely fixed and do not move with respect to each other or the faces of contact slip on each other. When slip is considered, the presence or absence of friction must also be defined. If there is friction, the coefficient of friction will determine the degree of slippage in the contact area. The classification of contact conditions is almost the same for node bonding, but they can be set with more detail. For example, it is also possible to combine joints by using elastic elements such as springs and spot welds. In some analysis software, simply defining the assembly analysis may automatically combine parts and components in this or some other way. Next, let’s examine the influence of mesh size and mesh type on the calculation results of assembly analysis. Here, we will set as example the case of analyzing the stress of a simple assembly of two solid structures. The model consists of two objects, cubes with sides 100 mm long, facing each other as shown in Fig. 2. Set the constraint on Object B and set the load condition on Object A. The constraint on Object B completely restrains the entire face opposite to the face of contact. The load condition set for Object A provides a concentrated load in the direction towards Object B and applied at the center of the face opposite to the face of contact. The initial state is set so that the two objects are slightly apart. When the load is applied, the two objects are brought into contact with each other on the facing surfaces, defining the contact condition in this common area. This contact condition is set as a relatively simple ‘post-contact fixation’, or ‘glue contact’, condition. The calculation results are indicated by the stress distribution on the contact surface of Object B.
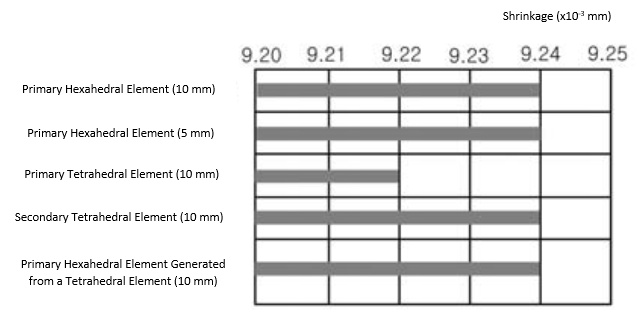
Figure 2: Analytical Model of Assembly The following five analytical model variations are prepared to examine the influence of the type and size of the mesh elements on the calculation results:· Case 1: Object A and Object B are both divided into primary hexahedral elements with sides 10 mm long (Fig. 3 (a)).· Case 2: Object A is divided into primary hexahedral elements with sides 10 mm long, and Object B into primary hexahedral elements with sides 5 mm long (Fig. 3 (b)).· Case 3: Each side (100 mm long) of Object A and Object B is divided into tetrahedral primary elements so that 10 nodal points are generated (Fig. 4 (a)).· Case 4: Each side (100 mm long) of Object A and Object B is divided into tetrahedral secondary elements so that 10 nodal points are generated (Fig. 4 (b)).· Case 5: Each side (100 mm long) of Object A and Object B is divided first into tetrahedral elements by 5 nodal points, and then, by use of an automatic element division function, each side of the tetrahedral elements is divided into hexahedral primary elements.In Cases 1 and 2, the type of element used (hexahedral primary element) is the same, but the sizes of this element for Object A and Object B are different in Case 2. Also, Case 1 and Cases 3 – 5 have the same size of elements but different kinds.Figure 3: Analysis Results When Using Hexahedral Primary Elements First, let’s look at the results of Cases 1 and 2, which are divided into hexahedral primary elements (Fig. 3). In general, an analytical model divided into hexahedral elements provides the most accurate results. If we compare Case 1 and Case 2, it can be seen that the stress distribution is almost the same, although there are subtle differences in shape. When looking only at the results, the calculation time is naturally shortened as the number of elements decreases, so Case 1 is considered sufficiently accurate. Moreover, in Case 1, the node positions on the contact surfaces of both objects are perfectly matched. Some analysis software has the built-in function of improving the mesh around contact areas, so this should be confirmed as well, in case the software does not do it automatically.Figure 4: Analysis Results When Using Tetrahedral Elements Secondary tetrahedral elements are suitable for the automatic segmentation of complex shapes, and the results they produce, such as deformation, are usually more accurate than the ones produced by primary elements. However, it is better to refrain from using secondary elements in contact areas. Secondary elements have an additional node (intermediate node) between the two nodes (vertex nodes) present in a primary element; the calculation method for the stress value is different for the intermediate node than it is for the vertex nodes. There is no problem with this difference in methods when performing structural analysis of just a component part, but, when analyzing the contact area in an assembly analysis, this difference adversely affects the stress results and often leads to erroneous calculations. Therefore, if you use a tetrahedral element, you can distinguish the difference between primary and secondary types. For example, if attention is paid to the shrinkage of the object in the load direction, the tetrahedral secondary element is more accurate than the primary (Fig. 5). This was also explained in the second article of this series, where the use of tetrahedral primary elements was shown to increase the stiffness of the analytical model, resulting in a small deformation. Let’s now take a look at the results of Cases 3 and 4, which were divided using tetrahedral elements (Fig. 4). Case 3 shows the same stress distribution as Case 1 or 2, which were divided into hexahedral elements. However, Case 4 shows a more disparate behavior. The difference between Case 4 and the other cases is the degree of the element; the elements in all cases except Case 4 are primary elements. Case 4 uses secondary tetrahedral elements, which are the most commonly used in structural analysis.
Figure 5: Shrinkage in the Direction of Load
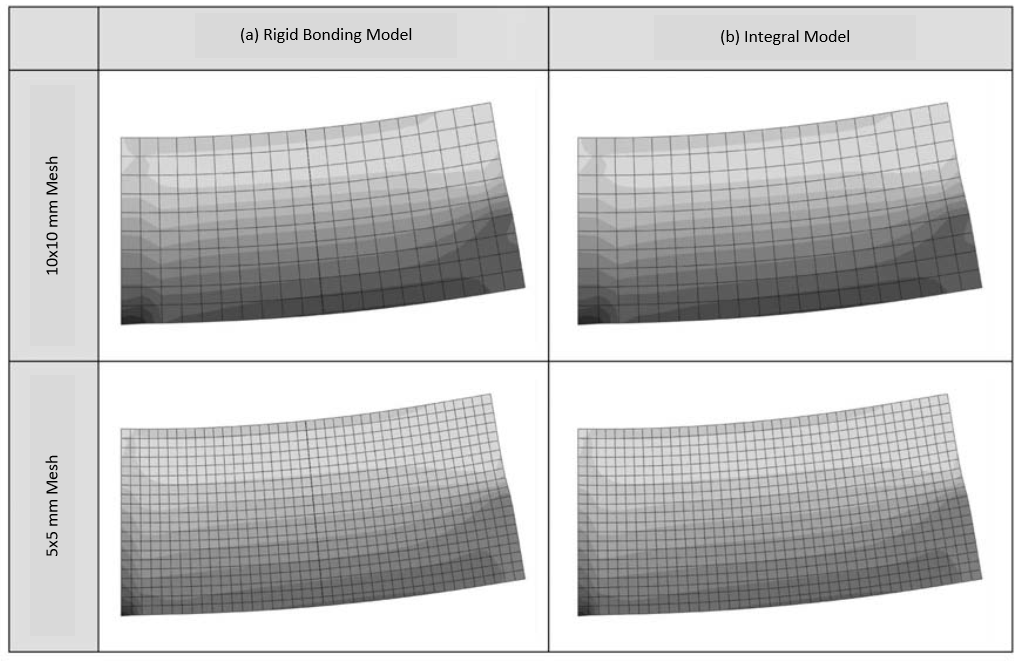
However, it is difficult to avoid using tetrahedral elements when considering the use of automatic segmentation for the generation of the analytical model. If tetrahedral secondary elements are used, it is preferable to use them after recognizing that the stress distribution will most likely be incorrect (Fig. 4 (b)); have also in mind primary elements will output small deformations. The next best alternative is to create a tetrahedral element as an auto-segmentation element, dividing this tetrahedral element into a hexahedral one (Case 5). Although the final element won’t be a cube, as in Case 1, it is hexahedral and primary nonetheless. In fact, in the analytical model, the stress distribution and deformation results for Case 5 were almost the same as in Case 1 (Fig. 6). However, since the hexagonal surface shape is now distorted from a square, it is better to still check the reliability of the analysis results depending on the software used; this should be consulted with an expert in the software. When considering sliding after contact, remember to set ‘sliding’ and ‘friction coefficient’ as the contact conditions.Figure 6: Analysis Results When Using Primary Hexahedral Elements Generated from Tetrahedral Elements The example studied above calculates assembly analysis for two objects initially separate and that come into contact. In assembly analysis, in addition to this method, when the objects are in contact in the initial state and slip does not occur, there is another method of calculation. Let’s examine now the effect of a rigid bond on the mesh element size (Fig. 7 (a)); the model consists of two 100 x 100 x 1 mm plates rigidly bonded to each other. As shown in the figure, the left side is completely constrained, and the tensile load is applied at the lower half of the right side. The coupling between the shell elements combines the translational degrees of freedom in the X-, Y-, and Z-axis directions and the rotational degrees of freedom in the X-, Y-, and Z-axis rotations. Thus, the two plates are completely combined. The calculation was performed using an analytical model of a case where one side was divided into a 10 mm square and another side into a 5 mm square (Fig. 8).
Figure 7: Analytical Models with Shell Elements

Figure 8: Stress Distribution of Models with Shell Elements
These results are then compared with the results of analysis of just one bigger plate (200 x 100 x 1 mm) (Fig. 7 (b)). It was expected for the stress distribution and deformation to be different from the one-piece model because stiffness of the rigid-bond model is large. It was also expected that the smaller mesh would be close to an all-in-one model due to the low impact of rigidity by the bond. However, contrary to these expectations, there is almost no difference between the one-body model and the rigid-bond model regardless of mesh size. This is probably due to the fact that the square shape of the model is ideal for the square shape of the elements. It cannot be assured, therefore, that the same result will be obtained when using tetrahedral elements.


